How do I create a pay run?
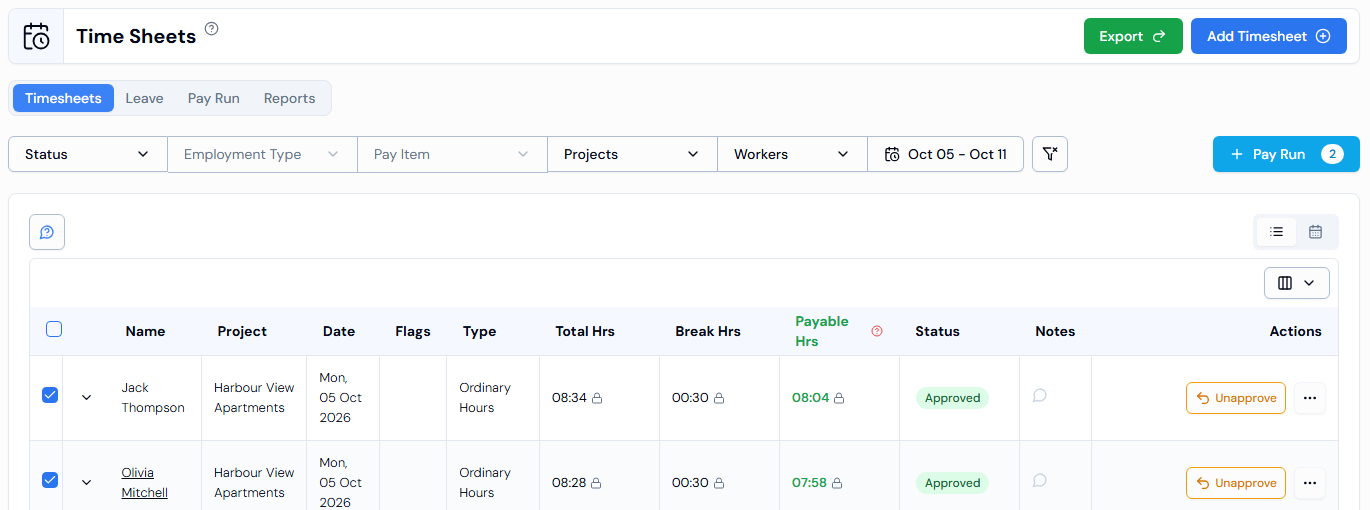
On the Timesheets page, pick a pay period, tick the approved timesheets and click the blue Pay Run button.
Before you start
- Connect Xero or MYOB. The Pay Run button only appears once one is connected.
- Set up your pay period and pay items. See How do I set up a pay period?
- If you use Xero, link each worker in Map Employees.
- Approve the timesheets. See How do I approve or reject timesheets?
Steps
- In the left menu, under Field Operations, click Timesheets.
- Click the date button. On the Pay Period tab, pick the pay period and click Apply. Custom dates won't work.
- If you use Xero, set the Employment Type filter to Employee. Xero pay runs are for employees only.
- Set the Status filter to Approved.
- Tick the timesheets you want to pay.
- Click the blue Pay Run button. A message confirms the pay run was created.
Example
Your weekly pay period is 12–18 October and you pay through Xero.
- You pick the 12–18 October pay period on the Pay Period tab and click Apply.
- You set Employment Type to Employee and Status to Approved.
- You tick the approved timesheets for Mia, Tom and Ravi. The number on the Pay Run button shows 3.
- You click Pay Run. The pay run appears on the Pay Run tab as Ready to Send, ready to send to Xero.
Good to know
- Swift Checkin sends the pay run to Xero or MYOB, not single timesheets. See What is a pay run?
- The number on the Pay Run button shows how many approved timesheets you picked.
- Your pay runs are listed on the Pay Run tab, with Pay Period, No Of Workers, Total Hours, Amount, Status and Line Items.
- Next, send it to payroll. See How do I send a pay run to Xero? or How do I export a pay run to MYOB?
If something goes wrong
- No Pay Run button – connect Xero or MYOB. For Xero, also set Employment Type to Employee.
- Pay Run button is greyed out – tick at least one Approved timesheet.
- Only approved timesheets are allowed – untick any timesheet that isn't approved.
- Something is missing window (Xero) – some workers or pay items aren't linked to Xero. Click Go to Settings, finish Map Employees and Setup PayItems, then try again.
- For every reason with an example, see Why can't I create a pay run?