How to Create App Users and Onboard Them
App users are the workers and site managers who use the SwiftCheckin mobile app to check in and out of site. This article shows you how to add a new app user, what each field means, and how a new app user moves from the Waiting Approval tab to the Active tab.
App users are different from admin users, who log in to this web platform.
Before you start
Have these details ready for the worker:
- First name and last name
- Mobile phone number
- Email address
- Their employment type (employee or subcontractor)
- Their worker category – a group of workers who do similar work, such as "Electricians". Categories must be set up first.
- For external subcontractors: the company they work for. The company must already be added.
Step 1: Open the App Users page
- In the left-hand menu, under Platform, click App Users.
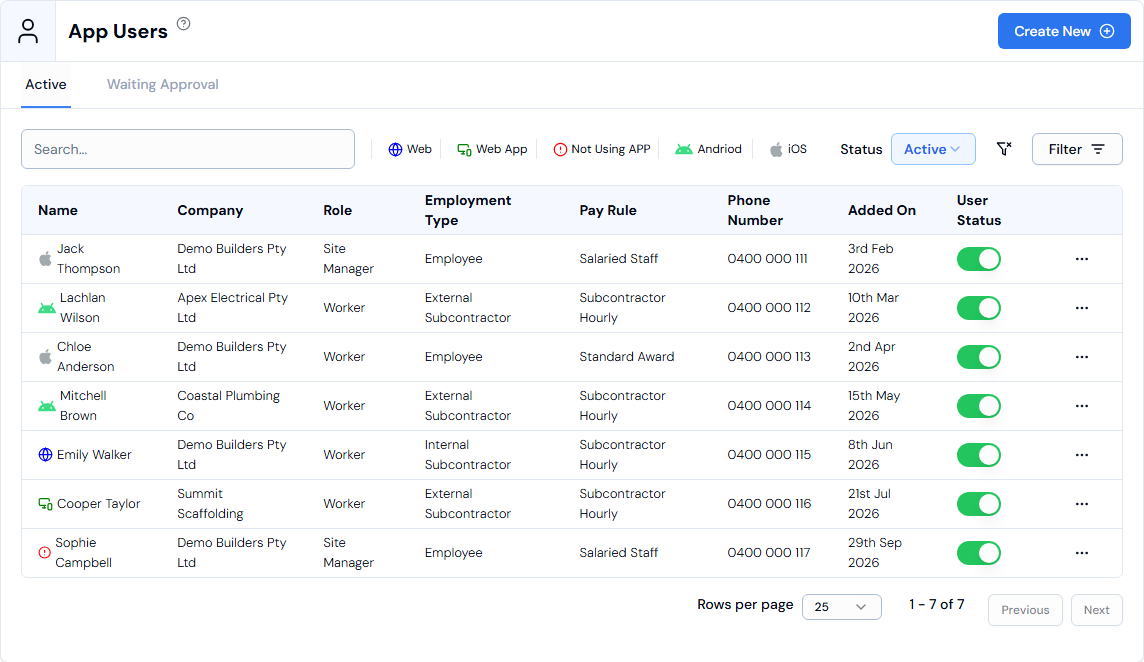
- The App Users page opens. It has two tabs: Active and Waiting Approval. You can add a new app user from either tab.
Step 2: Open the Create App User panel
- Click the Create New button in the top-right corner.
- The Create App User panel opens on the right side of the screen.
Step 3: Choose the employment type
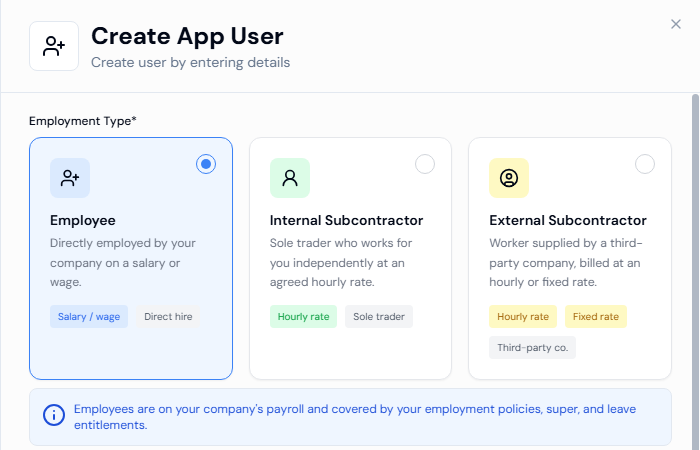
Under Employment Type*, click one of the three cards. Employee is selected by default.
- Employee: employed directly by your business on a salary or wage, and paid through your payroll.
- Internal Subcontractor: an independent tradesperson with their own ABN who works for you at an agreed hourly rate. They can submit invoices in the app and manage their own tax and super.
- External Subcontractor: a worker supplied by an external subcontracting company, billed at an hourly or fixed rate. You are billed through that company.
Employment type is about how someone works with your business. What they can do in the app is set by their Role in Step 6.
The fields further down change depending on what you pick.
Step 4: Fill in the worker's details
| Field | What to enter |
|---|---|
| First Name* | The worker's first name (at least 2 letters). |
| Last Name* | The worker's last name. |
| Phone Number* | Click the flag to choose the country, then type the mobile number. Australia is selected by default. |
| Email Address* | The worker's email address. |
| Worker Category* | The group this worker belongs to. The first category is picked for you – change it if needed. |
| Pay Rule* | The pay rule for this worker – the set of rules your organisation uses to work out how their hours are paid. The first one is picked for you. |
Only for Internal Subcontractor:
| Field | What to enter |
|---|---|
| ABN* | The worker's ABN, for example 96 626 727 615. |
| GST included* | Choose Yes if their rate includes GST, or No if it does not. |
Only for External Subcontractor:
| Field | What to enter |
|---|---|
| Company | The company the worker belongs to. Your default company is picked for you. |
Employees and internal subcontractors are always linked to your default company (your own business).
Step 5: Set up time tracking
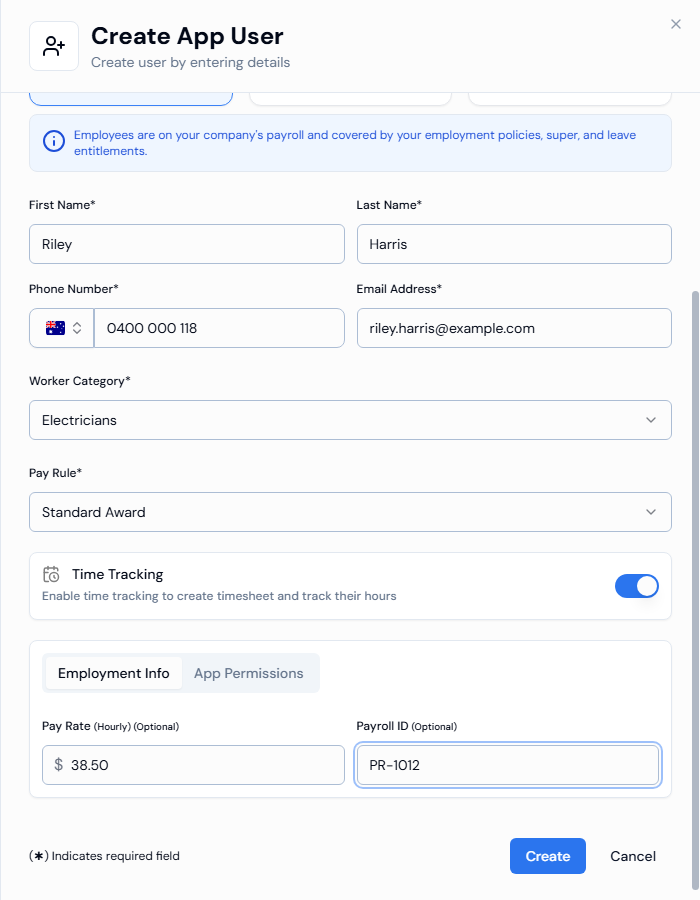
Time Tracking is turned on by default. When it is on, SwiftCheckin creates timesheets for this worker and tracks their hours.
If time tracking is on, open the Employment Info tab and fill in (both are optional):
| Field | What to enter |
|---|---|
| Pay Rate (Hourly) | The worker's hourly pay rate, for example 35.00. |
| Payroll ID | The worker's ID in your payroll system. |
If you turn Time Tracking off, the Employment Info tab is hidden and no pay rate or payroll ID is saved.
Step 6: Choose the app role
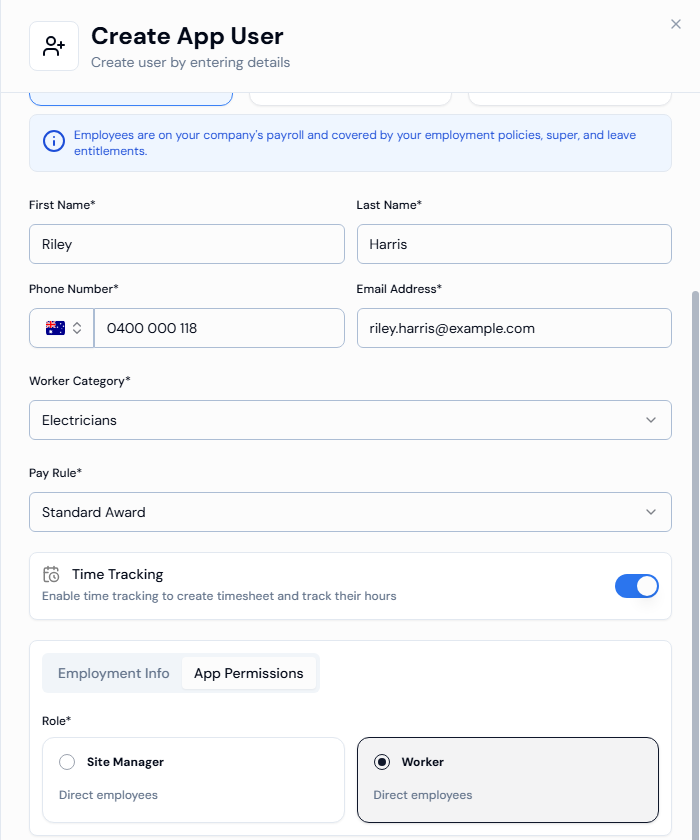
- Open the App Permissions tab.
- Under Role*, click Worker, Site Manager or Admin.
Step 7: Create the app user
- Click Create.
- You will see New app user created successfully.
- The panel closes and you are taken to the Waiting Approval tab, where the new app user now appears.
To close the panel without saving, click Cancel.
Step 8: Onboard the worker
A new app user starts on the Waiting Approval tab. This tab shows all invited site users who are waiting to be approved by your organisation.
- Let the worker know they have been added, so they can start using the SwiftCheckin mobile app.
- Go to App Users and open the Waiting Approval tab to see where they are up to. Once they have joined, they appear on the Active tab.
What the worker receives after you create them (for example, a text message or email invite with a link to the app), and exactly when they move from Waiting Approval to Active, is to be confirmed.
Waiting Approval statuses
| Status | What it means |
|---|---|
| pending | The app user has been added and is waiting to finish joining. |
| qr pending | The worker signed themselves up (for example, by scanning a QR code) and is waiting for you to accept them. |
| waiting | The request is still waiting for a response. |
| declined | The request was declined. |
By default the Waiting Approval tab shows pending and qr pending app users. Use Filter > Status to see others.
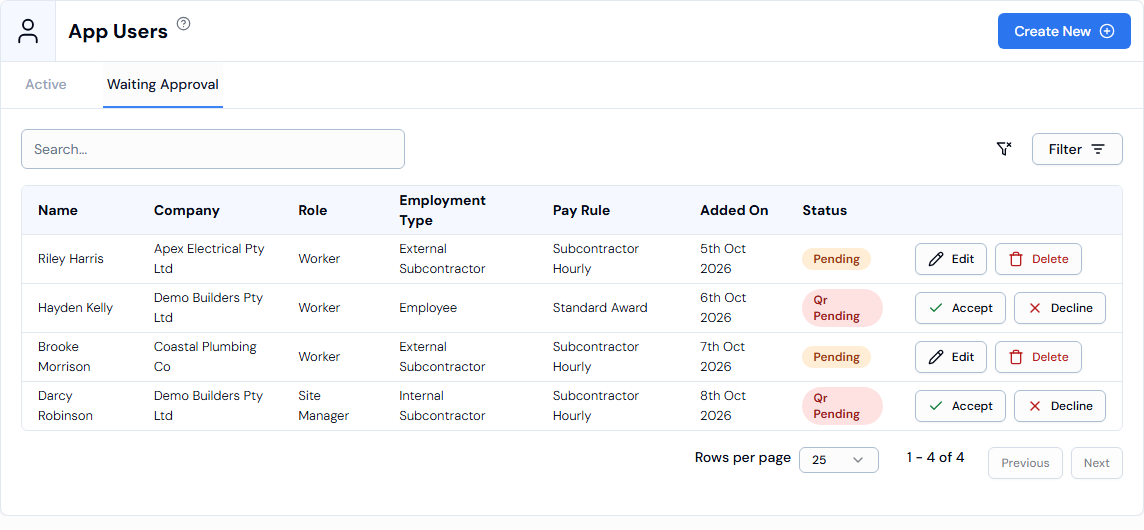
Accepting a worker who signed up themselves
When a worker signs up themselves, they show as qr pending. To accept them:
- On the Waiting Approval tab, find the worker's row.
- Click the Accept button at the end of the row. The Accept App User panel opens with the message Fill details before accepting.
- Check and complete their details (the same fields as above).
- Click Accept. You will see App user updated successfully.
To turn them away instead, click Decline at the end of the row, then confirm in the Confirm Decline window. This cannot be undone.
Step 9: Add the worker's documents (optional)
Once the app user is created, you can upload their documents, such as licences or tickets, from their details page.
- On the Active tab, click the worker's row to open their details page.
- Click the Documents tab, then click Upload Document.
For the full steps, see How to view and edit app users.
Troubleshooting
| Message | What to do |
|---|---|
| First name must be at least 2 characters long | Enter a first name with 2 or more letters. |
| Last name cannot be empty | Enter a last name. |
| Invalid international phone number format | Check the country flag and the phone number. |
| Email is required | Enter an email address. |
| Please enter a valid email address | Check the email for typing mistakes, for example a missing @. |
| No worker categories found. | Create a worker category first. |
| No companies found. | Add the company first. |
If the save fails for another reason, a red message at the top of the screen explains why.