How to View and Edit App Users
App users are the workers and site managers who use the SwiftCheckin mobile app. This article shows you how to find app users, open their details page, upload and check their documents, see their check-in history, edit their details, and turn their access on or off.
Before you start
- The app user must already be added. See How to create app users and onboard them.
- To upload a document, have the file ready as a PDF, JPEG/JPG or PNG image, no bigger than 12 MB.
Step 1: Open the App Users page
- In the left-hand menu, under Platform, click App Users.
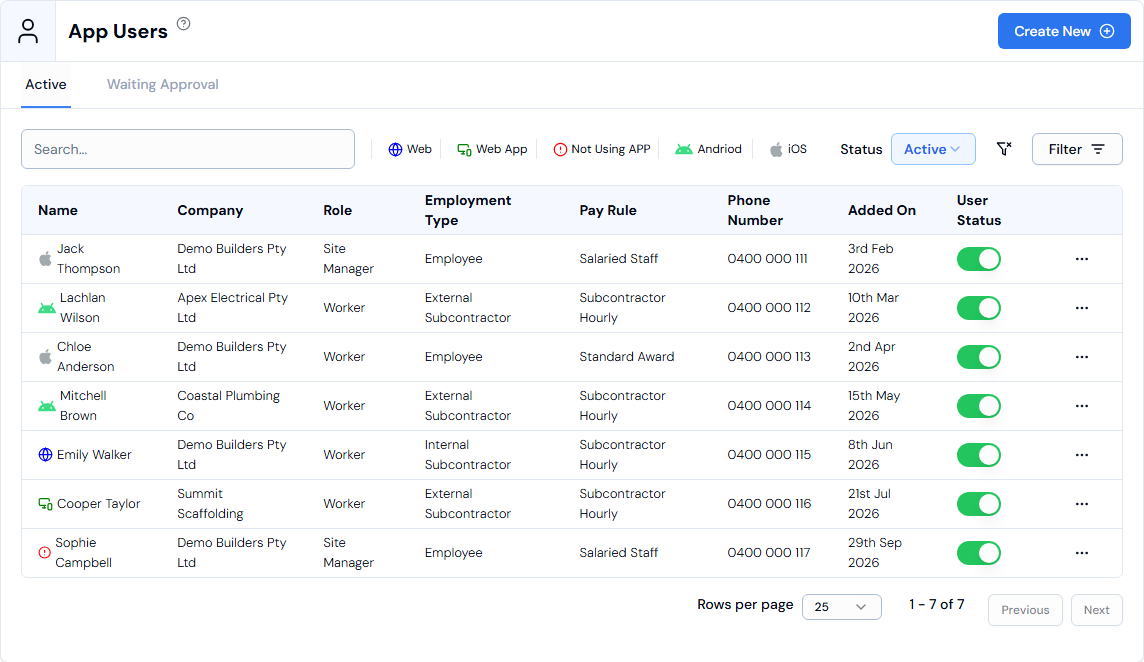
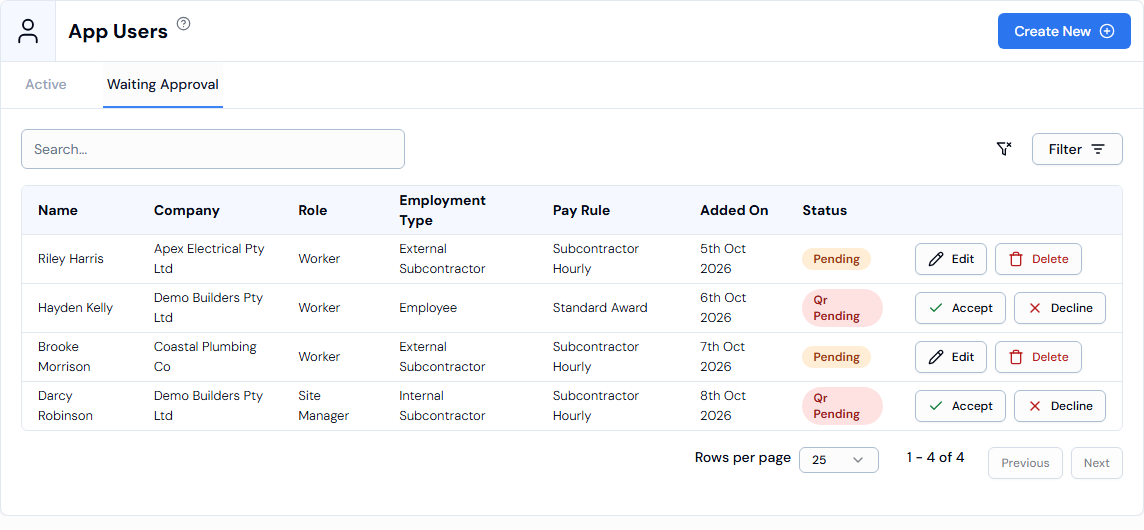
- The App Users page opens. Choose a tab:
- Active – app users who are set up and using the SwiftCheckin onsite mobile app.
- Waiting Approval – app users who have been invited and are waiting for approval from your organisation.
Step 2: Find an app user
- Type a name in the Search... box.
- Click Filter to narrow the list, choose your options, then click Apply Filter. The number on the Filter button shows how many filters are on.
- Click the funnel icon with a cross (Clear Filters) to remove all filters and the search.
- Use Rows per page, Previous and Next at the bottom to move through the list.
| Filter | What it does |
|---|---|
| Category | Shows only workers in one worker category. |
| Role | Shows only Worker or Site Manager app users. |
| Company | Shows only app users from one company. |
| Type | Shows only one employment type: Employee, Internal Subcontractor or External Subcontractor. |
| Status (Waiting Approval tab only) | Shows only Declined, Pending, Waiting or QR Pending app users. |
On the Active tab, use the Status drop-down next to Filter to switch between Active and Inactive app users.
Step 3: Read the Active tab
| Column | What it means |
|---|---|
| Name | The app user's name. The small icon before the name shows how they use SwiftCheckin (see below). |
| Company | The company they belong to. |
| Role | worker or site manager. |
| Employment Type | Employee, Internal Subcontractor or External Subcontractor. |
| Pay Rule | The pay rule used to work out how their hours are paid. |
| Phone Number | Their phone number. |
| Added On | The date they were added. |
| User Status | A switch that shows if the app user is turned on (green) or off (red). |
The icon before each name means:
| Icon label | What it means |
|---|---|
| Web | They use SwiftCheckin in a web browser. |
| Web App | They use the SwiftCheckin web app. |
| Not Using APP | They have not started using the app yet. |
| Android / iOS | They use the app on an Android phone or an iPhone. |
See a quick summary
Move your mouse over an app user's name. A small card shows their role, company, phone number, email, whether they are a high-risk worker, and whether time tracking is on.
Step 4: Open the app user's details page
- On the Active tab, click the app user's row. You can also click the ... button at the end of the row and choose View Details.
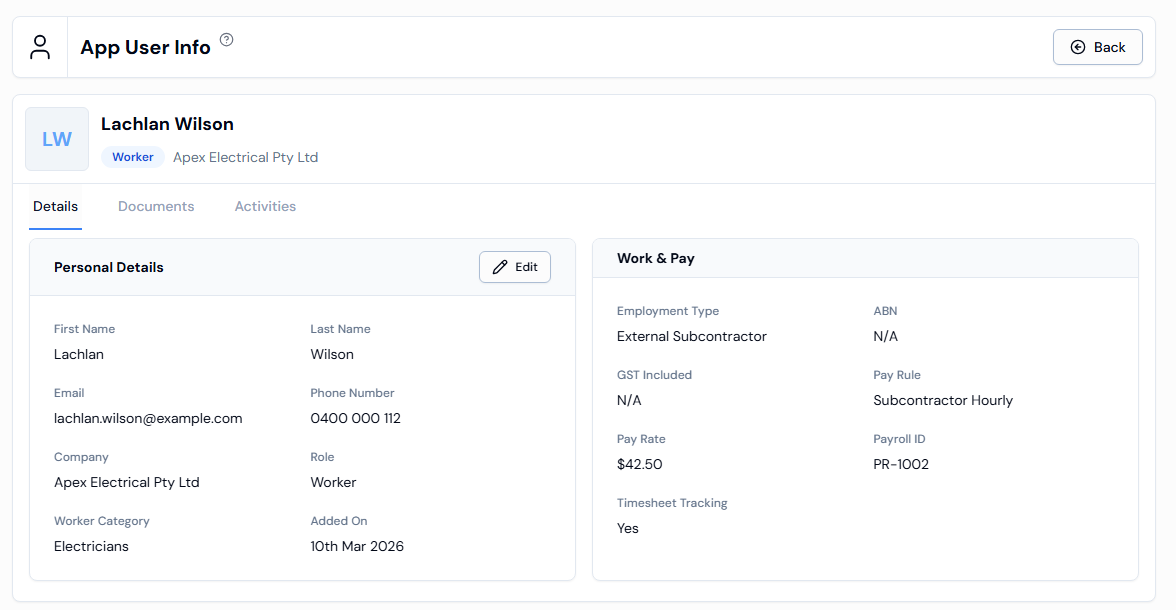
- The App User Info page opens. At the top you see their photo (or initials), name, role, company, and an On-Site label if they are checked in on site right now.
- The page has three tabs: Details, Documents and Activities.
To go back to the list, click Back.
The Details tab
| Section | What it shows |
|---|---|
| Personal Details | First Name, Last Name, Email, Phone Number, Company, Role, Worker Category and Added On. Click Edit here to change their details (see Step 7). |
| Work & Pay | Employment Type, ABN, GST Included, Pay Rule, Pay Rate, Payroll ID and Timesheet Tracking. |
N/A means that detail has not been entered.
Step 5: Upload and check the app user's documents
Use the Documents tab to keep the worker's files in one place, for example licences, tickets or inductions.
Upload a document
- On the app user's details page, click the Documents tab.
- Click Upload Document. The Upload Document panel opens.
- Fill in the details:
| Field | What to enter |
|---|---|
| Document Type | The kind of document, for example "White Card" (optional). If the type you need is not in the list, click Add new type to create it. |
| Expiry Date | The date the document runs out (optional). Click Pick a date to choose it. |
| File* | Click the box and choose the file from your computer. You can upload a .jpeg, .jpg, .png or .pdf file up to 12 MB. |
- Click Upload. You will see Document uploaded successfully.
To close the panel without uploading, click Cancel.
Read the document list
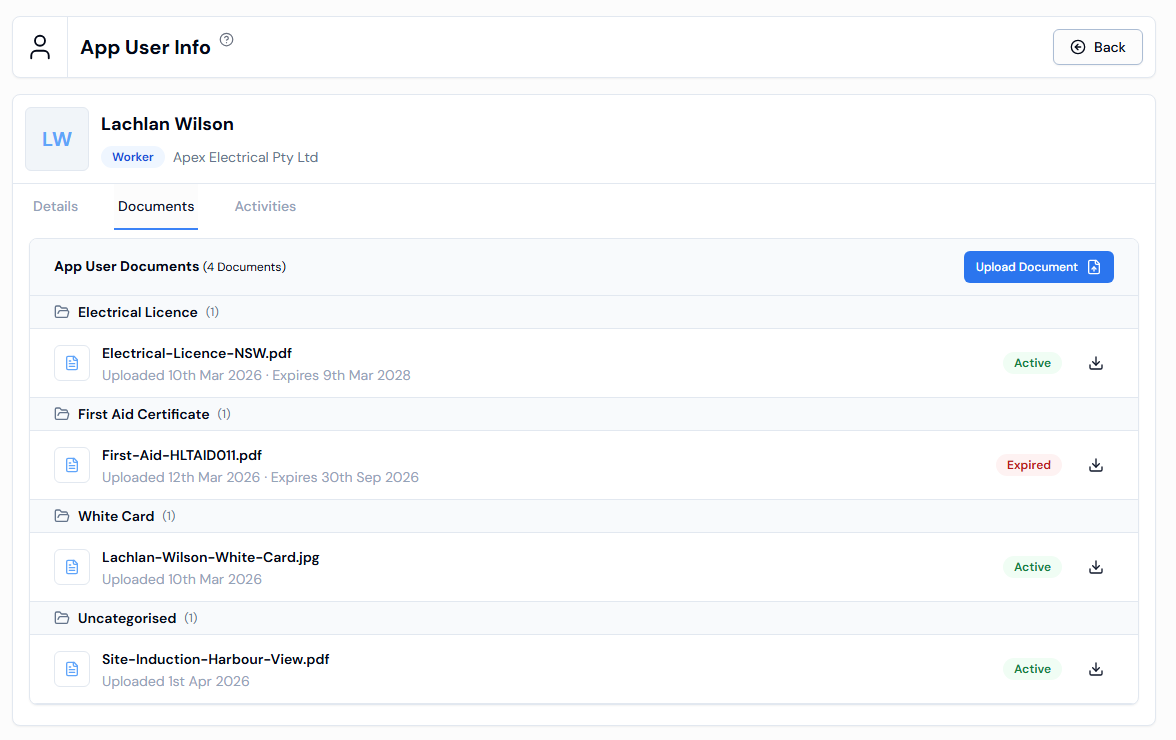
- Documents are grouped by Document Type. Documents without a type are shown under Uncategorised.
- Each document shows its file name, the date it was Uploaded, and the date it Expires (if one was set).
- The label on the right shows Active or Expired.
- Click the download icon to save a copy of the document.
- The list shows 10 documents at a time. Use the arrow buttons at the bottom to see more.
If there are no documents yet, you will see No Documents Found.
Step 6: See the app user's check-in history
- On the app user's details page, click the Activities tab. You can also go straight there from the list: click the ... button at the end of the row and choose Activities.
- The tab shows every check-in, with Project, Check-In At, Check-In Gate, Check-Out At and Check-Out Gate. A gate is the site location where the worker checked in or out.
- Use the More column to see the Check-In Details and Check-Out Details.
Icons on this tab show an Off-Site Checkout and an Auto check-out.
Check-in history needs an active subscription. If your organisation does not have one, you will see Upgrade to Premium Version to view the CheckIns.
Step 7: Edit an app user
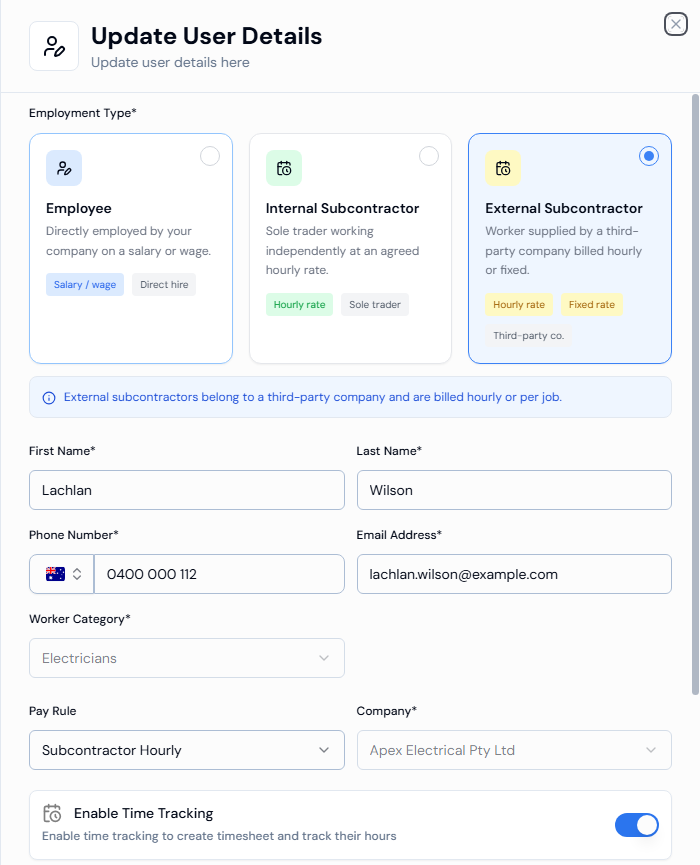
- Open the Update User Details panel in one of these ways:
- On the app user's details page, click Edit in the Personal Details section.
- On the Active tab, click the ... button at the end of the row and choose Edit.
- On the Waiting Approval tab, click the app user's row, or click Edit at the end of the row.
- Change the details you need. These are the same fields you filled in when creating the app user: Employment Type, First Name, Last Name, Phone Number, Email Address, Worker Category, Pay Rule, Enable Time Tracking, and the Employment Info and App Permissions tabs.
- Click Update.
- You will see App user updated successfully.
To close the panel without saving, click Cancel.
Fields you may not be able to change
| Field | When it is locked |
|---|---|
| Company | Always locked when editing. |
| Worker Category | Locked once a category has been set. |
| Phone Number | Locked if the worker signed themselves up, or has already been accepted. |
| Role, Pay Rule, Enable Time Tracking and Email Address | Locked while the worker is checked in on site. You will see the message Role, Pay rule and Time tracking are disabled due to the user is onsite. Try again after they check out. |
On the Waiting Approval tab, Edit is not shown for workers who signed themselves up. Use Accept instead. See How to create app users and onboard them.
Step 8: Turn an app user on or off
On the Active tab, click the User Status switch for the app user.
- Green means the app user is active.
- Red means the app user is inactive.
You will see App user status updated successfully. Inactive app users move to the Inactive view (use the Status drop-down to see them).
Step 9: Read the Waiting Approval tab
The Waiting Approval tab has the columns Name, Company, Role, Employment Type, Pay Rule, Added On and Status. The buttons at the end of each row are Edit, Delete, or Accept and Decline for workers who signed themselves up.
| Status | What it means |
|---|---|
| pending | The app user has been added and is waiting to finish joining. |
| qr pending | The worker signed themselves up and is waiting for you to accept them. |
| waiting | The request is still waiting for a response. |
| declined | The request was declined. |
Other actions
- Invite (Active tab, ... menu) – shown for app users who are outside your organisation. A Confirm Invite window asks: Are you sure you want to invite the outsider to your organization? Confirm to send. You will see Invited Successfully.
- Delete (Active tab ... menu, or the Delete button on the Waiting Approval tab) – removes the app user. A Confirm Deletion window asks: Are you sure you want to delete this item? This action cannot be undone. Confirm to delete. You will see App user deleted successfully.
Good to know
| Topic | What you need to know |
|---|---|
| Old links | Old links to the Active or Pending pages, or to a worker's activities page, now open the matching tab on the new App Users or App User Info page. |
| Company page | You can also open an app user's details page from the App Users list on their company's details page. |
| Document types | The Document Type list is the same list you manage under Document Types in the left-hand menu. |
Troubleshooting
| Message | What to do |
|---|---|
| No results. | No app user matches your search or filters. Click Clear Filters and try again. |
| Invalid international phone number format | Check the country flag and the phone number. |
| Please enter a valid email address | Check the email for typing mistakes. |
| Please choose a file to upload | Choose a file in the File* box before you click Upload. |
| Allowed file types: .jpeg, .jpg, .png, .pdf | The file is not a supported type. Save it as a PDF or image and try again. |
| File must be 12 MB or smaller | The file is too big. Make it smaller and try again. |