How to Create a Budget and Add Variations
A budget is the amount of labour time and money you plan to spend on a project. SwiftCheckin compares your budget with what workers actually spend, so you can see early if a project is going over.
When the work changes after the budget is set (for example, the client asks for extra work), you add a variation. In SwiftCheckin, variations are called Change Orders. A change order adds extra hours and money on top of the original budget, without changing the original figures.
Before you start
- The project must already exist. See How to Create a Project with Site Locations.
- You need an admin role that can manage budgets. Users with the project member role can view budgets and change orders, but they do not see the Add Budget, Edit, Delete or Add New buttons.
- The Budgets feature must be switched on for your organisation. If you can't see it in the menu, ask your account administrator.
Step 1: Open the Budgets page
-
In the left-hand menu, go to the Finance section.
-
Click Cost Management, then Budgets.
Depending on how your account is set up, you may instead see Budgets directly under Finance. Both open the same page.
Step 2: Choose the project
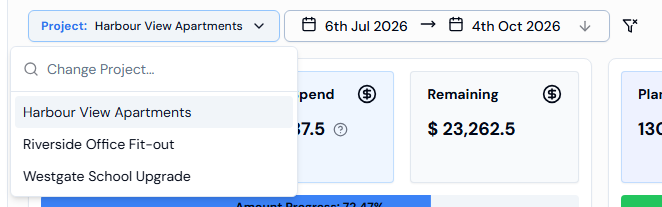
- At the top of the page, click the Project: button.
- Type in the Change Project... box to search, then click the project you want.
The page now shows the budgets for that project.
Step 3: Add the budget
- Click Add Budget at the top right. The Add Budget window opens.
- Fill in the fields (see the table below). Fields marked with
*are required. - Click Create.
You will see the message "Budget created successfully." and the new budget appears in the table at the bottom of the page.
| Field | What to enter |
|---|---|
| Budget Name* | A short name, for example "Level 2 fit-out labour". Must be 2 to 50 characters. |
| Description | Optional notes about what the budget covers (up to 200 characters). |
| Quantity* | The total work hours you expect the job to need, for example 300. |
| Unit Cost* | The hourly rate you are budgeting for, for example 20. |
| Opening Amount | Optional. Money already spent before you started tracking in SwiftCheckin. |
| Opening Hours | Optional. Hours already worked before you started tracking in SwiftCheckin. |
| Start Date* | The planned start date of the work. |
| End Date* | The planned end date of the work. |
| Status* | Active, Pending or Completed. |
| High Risk Work | Turn this switch on if the work involves risk. |
Click Cancel to close the window without saving. Anything you typed is cleared.
Step 4: Add a variation (change order)
-
In the budget table, find the budget and click the three dots (...) at the end of its row.
-
Click Change Orders. The Change Orders page opens for that budget.
-
Click Add New. The Add Change Order panel opens.
-
Fill in the fields (all are required):
Field What to enter Name* A short name for the variation, for example "Extra bathroom tiling". 2 to 50 characters. Description* What changed and why (2 to 200 characters). Quantity* The extra work hours needed, for example 40. Unit Cost* The hourly rate for the extra work, for example 20. -
Click Add.
You will see the message "New budget change order created successfully." and the change order appears in the list.
Step 5: Check the change orders
The Change Orders page lists every variation for the budget:
| Column | What it shows |
|---|---|
| Name | The name of the change order. |
| Description | The reason for the change. |
| Quantity | Extra hours added. |
| Unit Cost | The hourly rate used. |
| Amount | The extra money added to the budget. |
| Added On | The date the change order was added. |
Use the Search... box to find a change order by name. Use Previous and Next to move between pages.
Once a budget has at least one change order, the Budgets page also shows a Change Orders column in the budget table, and the Budget Amount card shows the original amount plus the change orders.
Edit a budget
- On the Budgets page, click the budget's row, or click the three dots (...) and choose Edit. The Update Budget window opens.
- You can change Budget Name, Description, Opening Amount, Opening Hours, Status and High Risk Work.
- You can also set the Actual Start Date and Actual End Date. The planned dates are shown above these fields. Click the small pencil icon next to a planned date to change it.
- Click Update.
You will see the message "Budget details updated successfully."
Quantity and Unit Cost cannot be changed after the budget is created. If the amount of work changes, add a change order instead.
Delete a budget or change order
- Budget: click the three dots (...) on the row, then Delete. In the Confirm Deletion window, confirm. You will see "Budget deleted successfully."
- Change order: on the Change Orders page, click the red bin icon on the row, then confirm. You will see "Change order deleted successfully."
Deleting cannot be undone.
Good to know
- Budgets from Autodesk: if a project is linked to Autodesk, account administrators see a Sync Autodesk button. It brings in budgets from your Autodesk account. These budgets show a small info icon with the text "Indicates from partner account", and they cannot be deleted in SwiftCheckin.
- Required fields: if you leave a required field empty, or a name is too short, a message appears under that field and the budget is not saved until you fix it.