How to View and Analyse Check-in Records
The Checkin Records page is a full history of every check-in and check-out made by your app users. Use it to answer questions like "When did this worker arrive last Tuesday?" or "How many hours were worked on this project this week?". You can also export the records to an Excel file.
An app user is a worker, visitor or site manager who uses the SwiftCheckin mobile app to check in and out.
Before you start
This page is part of the paid plan. If your account does not have an active subscription, you will see Upgrade to Premium Version to view the CheckIns. instead of the records.
Step 1: Open the Checkin Records page
- In the left menu, under Field Operations, click CheckIns.
- Click Checkin Records.
Depending on how your account is set up, Checkin Records may appear directly under Field Operations instead.
Step 2: Read the records table
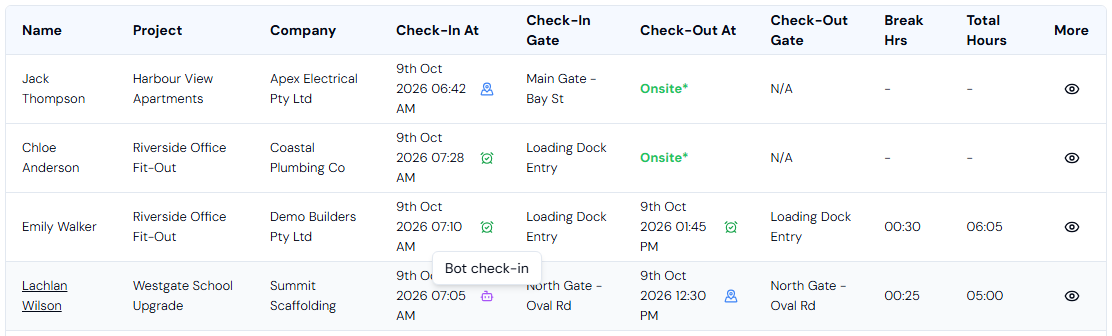
When the page opens, it shows records from the last 7 days, newest first. Each row is one visit to a site.
| Column | What it shows |
|---|---|
| Name | The app user's name. |
| Project | The project they checked in to. |
| Company | The company they work for. |
| Check-In At | The date and time they checked in, with a small icon showing how they checked in. |
| Check-In Gate | The check-in point they used. A gate is a check-in point at a site. In the left menu, these check-in points are listed under Site Locations. |
| Check-Out At | The date and time they checked out, with a small icon showing how. If it says Onsite*, they have not checked out yet. |
| Check-Out Gate | The check-out point they used. |
| Break Hrs | Time spent on breaks. This column only shows if breaks are turned on for your account. |
| Total Hours | The hours worked for that visit. |
| More | Click the eye icon to open the full details. |
If a value is missing, you will see N/A or -.
What the small icons mean
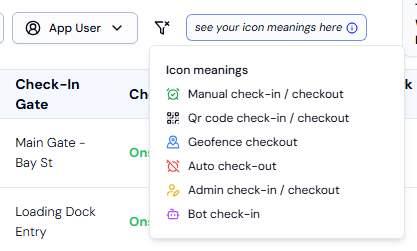
Click see your icon meanings here above the table for a quick key. You can also point your mouse at any icon to see its name.
| Icon name | What it means |
|---|---|
| Manual check-in / Manual checkout | The person checked in or out by hand in the app. |
| QR code check-in / QR code checkout | The person scanned a QR code at the site. |
| Geofence check-in / Geofence checkout | The app checked the person in or out because their phone entered or left the site area. A geofence is an invisible boundary around a site location. |
| Auto checkout | The system checked the person out automatically, for example if they forgot. |
| Admin check-in / Admin checkout | An office user checked the person in or out from the admin platform. |
| Bot check-in (purple robot icon) | The check-in was flagged as a bot check-in. See What a bot check-in means below. |
What a bot check-in means
A purple robot icon next to the Check-In At time marks a Bot check-in. This flag tells you the check-in was not made in the usual way by the person (by hand, QR code or geofence) or by an admin. Instead, it was recorded automatically, without the person doing it themselves.
Use the flag to spot check-ins you may want to look at more closely, for example before you approve a timesheet. The robot icon only appears in the Check-In At column. Check-outs are still shown with their normal icons.
Exactly when SwiftCheckin marks a check-in as a bot check-in is to be confirmed.
Total Working Hours
Above the table, Total Working Hours adds up the hours for all records that match your current filters. This is handy for a quick total for a project, a person or a week.
Step 3: Filter the records
| Filter | How to use it |
|---|---|
| Search... | Type a person's name. The list updates as you type. |
| Date range | Click the date button (it shows a start date and an end date). Pick a start date and an end date in the calendar, then click OK. OK stays greyed out until you have picked both dates. |
| Project: | Click the button (it says All Projects to begin with) and pick a project. Type in Change Project... to search. Pick All Projects to see every project again. |
| App User | Click the button and pick a person. Type in Search App User... to find them. When a project is selected, only people on that project are listed. |
A filter that is in use turns blue.
When you change the project, the App User filter is cleared. Pick the person again if you need to.
To remove all filters, click the Clear Filters button (the funnel icon with a cross). The date range goes back to the last 7 days.
Step 4: See the full details of a record
- Click a row, or click the eye icon in the More column.
- A panel opens on the right with three tabs.
Profile tab
- Overview: Company, Category, High Risk Worker (HRW) and Pay Rule.
- Questionnaire: the questions they answered when checking in, with their answers.
Details tab
- Check-In: Project, Check-In Gate and Check-In At. You may also see contract details, visit details (such as Visit Purpose) or work details (such as Budget Name, Work Type or Issue Title).
- Check-Out: Check-Out At, Check-Out Gate and Total Work Hours, plus progress or status details where they apply.
Location Access Logs tab
This tab shows the Location Access History: each time the person turned their phone's location access on or off, with the time (Changed At) and the result (Access Status: Enabled or Disabled). If nothing changed, you will see No location changes recorded.
Location access matters because the app needs it to check people in and out by geofence. If a worker often has location access Disabled, this may explain missing or suspicious check-ins.
Step 5: Move between pages
At the bottom of the table:
- Use Rows per page to show 25, 50 or 100 records at a time.
- Click Previous or Next to move between pages. The text next to them (for example "1 - 25 of 240") tells you which records you are looking at.
Step 6: Export the records to Excel
- Set the filters you want (date range, project and app user). The export uses the same filters as the table.
- Click the green Export button at the top right of the page.
- You will see the message "Your export is being processed. You'll be notified once it's complete."
- When the file is ready, open it from the Downloads button (the download arrow icon) at the top right of the screen. A red number on that button shows new downloads.
The file is an Excel spreadsheet.
Troubleshooting
| What you see | What to do |
|---|---|
| No results. | Nothing matches your filters. Widen the date range or click Clear Filters. |
| No results found. in the project or app user list | Nothing matches what you typed. Check the spelling. |
| OK is greyed out in the calendar | Pick both a start date and an end date. |
| Upgrade to Premium Version to view the CheckIns. | Your account needs an active subscription to see this page. |