How to Create a Crew Schedule
The Crew Schedule is a calendar that shows which workers are working where, and when. You build it by adding tasks. A task says: these workers will work on this project from this time to that time.
Before you start
- The project must already exist in SwiftCheckin.
- The workers you want to schedule must be active workers on that project.
Step 1: Open the Crew Schedule
In the left menu, under Field Operations, click Scheduler. The Crew Schedule page opens.
Step 2: Click New Task
Click New Task in the top-right corner of the schedule.

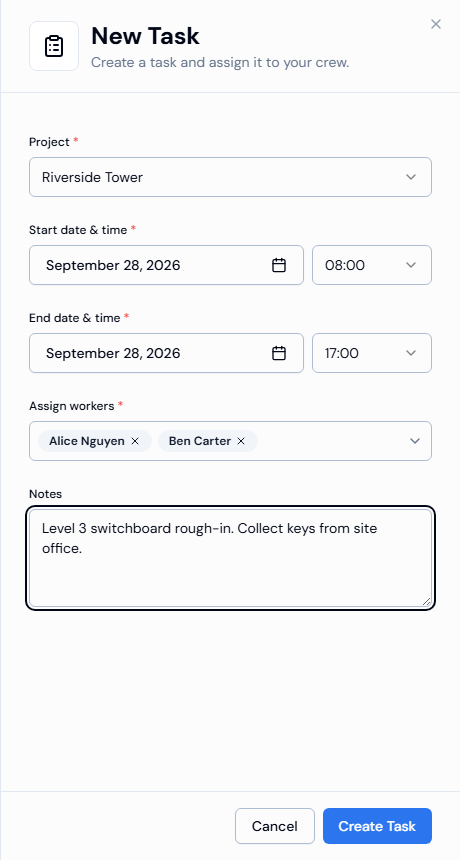
The New Task panel opens on the right.
If you've filtered the schedule to just one project, the panel opens with that project already chosen.
Step 3: Fill in the task
Fields marked with * are required.
| Field | What to enter |
|---|---|
| Project * | The project the work is for. |
| Start date & time * | Click Pick a date to choose the day, then choose the start time. The time starts at 08:00. |
| End date & time * | Choose the day and the finish time. The time starts at 17:00. |
| Assign workers * | The people doing the work. You can pick one or many. See How to Assign Crew to a Schedule. |
| Notes | Optional. Any instructions for the crew, for example Collect keys from site office. |
Good to know:
- You can't choose a date in the past.
- Times use the 24-hour clock (for example, 17:00 is 5 pm) and go up in 15-minute steps.
- When you pick a start date, the end date changes to the same day. If the work runs over several days, change the end date.
- The end must be later than the start.
- Choose the project before the workers. If you change the project, any workers you've already picked are removed, because each project has its own list of workers.
Step 4: Create the task
Click Create Task.
A message tells you how it went:
| Message | What it means |
|---|---|
| A message starting with ✅ (or New task has been created successfully.) | The task was created for everyone you picked. It now appears on the schedule, in the row of each worker. |
| A Heads up! message with a ✅ line and a ❌ line | The task was created for some workers but not others. The ✅ line says who was scheduled, and the ❌ line says who wasn't. The schedule refreshes to show only the tasks that were really created. Click Got it to close the message. |
| A message starting with ❌ | The task couldn't be created for any of the workers you picked. Read the message for the reason. |
When one worker is involved, the message names them. When several are involved, it gives a count instead.
The reasons a worker might not be scheduled (for example, already being booked at that time) are to be confirmed.
To close the panel without saving, click Cancel.
Troubleshooting
If the task isn't created, look for a red message under the fields:
| Message | What to do |
|---|---|
| Project is required. | Choose a project. |
| Start date & time is required. | Pick a start date. |
| End date & time is required. | Pick an end date. |
| End must be after start. | Make the end date and time later than the start. |
| Assign at least one worker. | Pick at least one worker. |