How to Create an Emergency Notification
An emergency notification is an urgent alert you send to your app users (the workers and other people who use the SwiftCheckin app), for example during a fire, evacuation or severe weather. Each person can reply to say whether they are safe, and you can track every reply in one place.
Before you start
- Only app users can receive an alert. Make sure your workers are set up as app users first. See How to Create and Onboard App Users.
- Emergency Notification is in the Safety section of the left menu. If you cannot see it, these features may not be turned on for your organisation. Ask your SwiftCheckin administrator.
Send an alert
Step 1: Open the Emergency Notification page
- In the left menu, under Safety, click Emergency Notification.
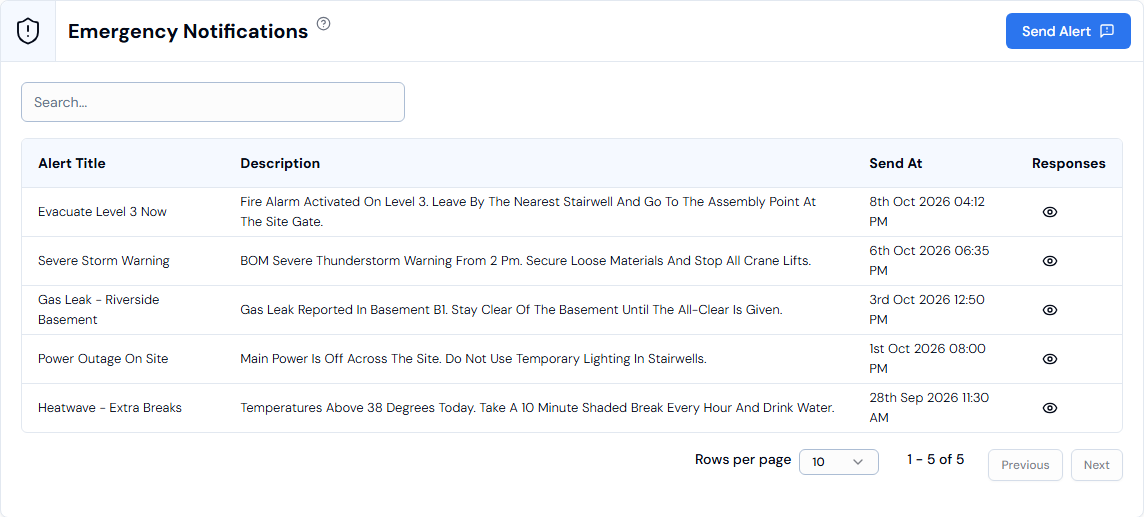
- The Emergency Notifications page opens with a list of alerts you have already sent.
Step 2: Start a new alert
- Click Send Alert in the top-right corner.
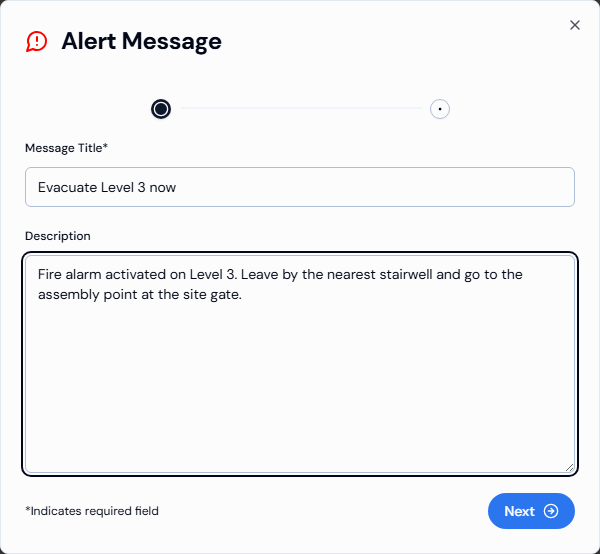
- A window called Alert Message opens. It has two steps, shown as dots at the top.
Step 3: Write the message (first step)
| Field | What to enter |
|---|---|
| Message Title* | A short, clear title, for example "Evacuate Level 3 now". Use 2 to 50 characters. |
| Description | More detail about what is happening and what people should do. Use 2 to 200 characters. |
Important
The Description field is not marked with a star, but you still need to fill it in before you can continue.
Click Next.
Step 4: Choose who receives the alert (second step)
- Wait while the list loads. You may briefly see Loading group structure...
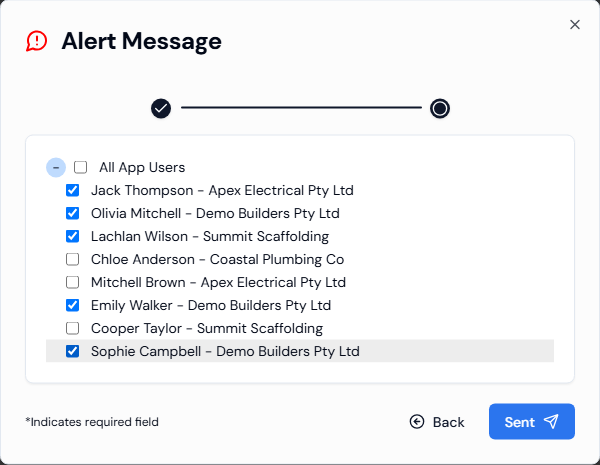
- You will see a list called All App Users. Each person is shown as their name followed by their company, for example "Sam Lee - ABC Builders".
- Click + to open the list, or - to close it.
- Tick the box next to each person who should receive the alert.
To go back and change your message, click Back. Going back clears the people you ticked.
Step 5: Send the alert
- Click Sent (the button with the paper-plane icon). This button only works after you tick at least one person.
- You will see a message confirming the alert was sent.
- The alert now appears at the top of the Emergency Notifications list.
Find an alert you sent
The Emergency Notifications list shows:
| Column | What it shows |
|---|---|
| Alert Title | The title of the alert. |
| Description | The details you entered. |
| Send At | The date and time the alert was sent. |
| Responses | Click the eye icon to see who has replied. |
- To find an alert, type part of its title into the Search... box.
- To show more alerts on each page, change Rows per page to 10, 20 or 30.
- Use Previous and Next to move between pages.
Track responses
- On the Emergency Notifications list, click an alert's row, or click the eye icon in the Responses column.
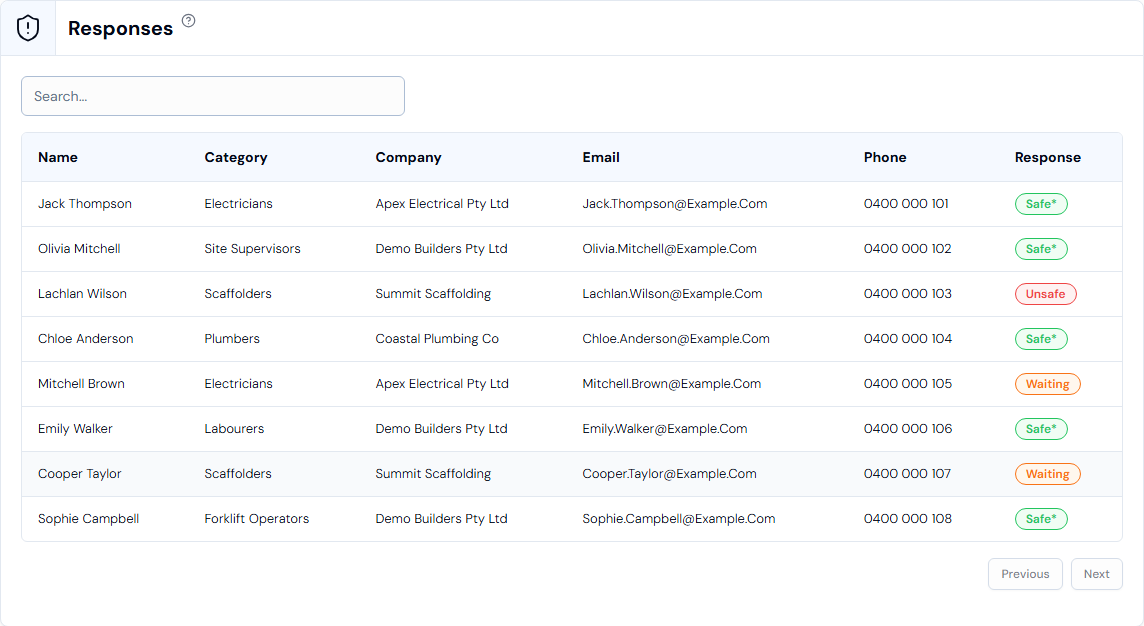
- The Responses page opens. It lists every person who received the alert.
| Column | What it shows |
|---|---|
| Name | The person's name. Hover over the name to see more details about them. |
| Category | Their worker category. |
| Company | The company they work for. |
| Their email address. | |
| Phone | Their phone number. |
| Response | Their reply (see below). |
What each response means
| Response | What it means |
|---|---|
| Safe (green) | The person has replied that they are safe. |
| Unsafe (red) | The person has replied that they are not safe. Follow up with them straight away. |
| Waiting (orange) | The person has not replied yet. |
To find someone quickly, type their first name into the Search... box.
tip
Check the Waiting and Unsafe people first. These are the people you may need to contact by phone.
Good to know
| Topic | Details |
|---|---|
| Editing and deleting | You cannot edit or delete an alert after you send it. |
| Who can receive alerts | Only app users appear in the list of people you can send to. |
Troubleshooting
| Problem | What to do |
|---|---|
| Next does not move you to the second step | Check that Message Title and Description are filled in and are the right length. |
| The Sent button cannot be clicked | Tick at least one person in the list. |