How to View Project-Based Attendance
If you run more than one project, you often only care about one site at a time. On the Site Attendance page you can pick a single project and see only the people who checked in, or stayed away, for that project.
A project is a construction job in SwiftCheckin. Each project has one or more site locations where workers check in.
Before you start
You need at least one project that has had check-ins on the day you want to look at. Projects only appear in the list when they have check-ins for the chosen date.
Step 1: Open the Site Attendance page
- In the left menu, under Field Operations, click CheckIns.
- Click Site Attendance.
Depending on how your account is set up, Site Attendance may appear directly under Field Operations instead. You can also click the Site Attendance > button on the Dashboard.
Step 2: Choose the date
- In the Project Sites panel on the left, click the date button at the top.
- Pick the day you want to see. You cannot choose a future date.
The list of projects updates for that day.
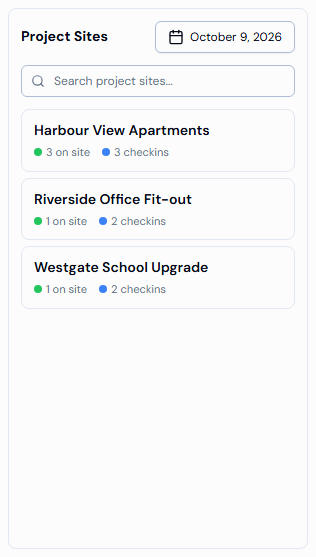
Step 3: Find your project in the Project Sites panel
The Project Sites panel lists your projects. Each project card shows two quick numbers:
| Label | What it means |
|---|---|
| on site (green dot) | How many people are checked in at the project and have not checked out yet. |
| checkins (blue dot) | How many check-ins have been completed at the project on that day. |
A number is only shown when it is more than zero.
If you have a long list, type part of the project name into the Search project sites... box to find it quickly.
The exact meaning of the checkins count (completed check-ins versus all check-ins) is to be confirmed.
Step 4: Select the project
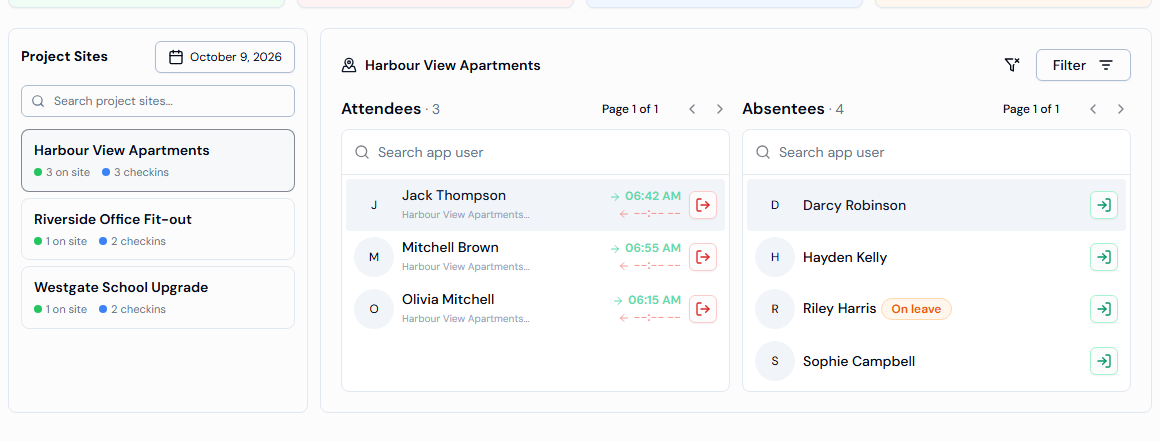
- Click the project card. It is highlighted with a blue border.
- The project name now shows above the lists, in place of All Projects.
The summary cards, the Attendees list and the Absentees list now show only that project.
To go back to all projects, click the same project card again.
On a phone or small screen, the Project Sites panel is hidden. Tap the project name (it says All Projects to begin with) at the top of the lists to open it.
Step 5: Filter by company (optional)
Once a project is selected, you can also show only one company's workers.
- Click Filter.
- In the Company box, choose a company. Only companies on the selected project are listed.
- Click Apply Filter.
To remove every filter (date, project and company), click the Clear Filters button (the funnel icon with a cross).
Step 6: Review who is on site
For the selected project you can now:
- See who checked in, with their check-in and check-out times, in the Attendees list.
- See who did not check in, and who is On leave, in the Absentees list.
- Click a name in Attendees to open their profile and check-in details.
- Check people in or out by hand.
These steps work the same as on the main page. See How to View and Filter Site Attendance for the full details.
Troubleshooting
| What you see | What to do |
|---|---|
| No Check ins found in your projects. | No project had check-ins on the chosen date, or your search did not match. Pick another date or clear the search box. |
| The Company box is greyed out | Select a project in the Project Sites panel first. |
| No companies found. | The selected project has no companies added to it. |