How to View Suspicious Check-ins and What They Mean
Sometimes a check-in or check-out does not look right. For example, the person may not have been at the site when they tapped the button. SwiftCheckin flags these as suspicious check-ins and lists them on one page so you can review them.
What makes a check-in "suspicious"?
A check-in or check-out is flagged when something about it does not match the rules for the site. The help icon next to the page title gives these examples:
- Outside the geofence: the person checked in or out while they were not inside the site area. A geofence is an invisible boundary drawn around a site location on the map. The app uses the phone's location to tell if a person is inside it.
- Unauthorised app user: the person is not allowed to check in at that project or location.
Other reasons may also appear. The exact reason for each entry is shown in the Reason column.
The full list of reasons SwiftCheckin can show is to be confirmed.
Before you start
This page is part of the paid plan. If your account does not have an active subscription, you will see Upgrade to Premium Version to view the CheckIns. instead of the list.
Step 1: Open the Suspicious Checkins page
- In the left menu, under Field Operations, click Suspicious Checkins.
You can also see how many suspicious check-ins happened on a day in the Suspicious Check-ins card on the Site Attendance page.
Step 2: Read the list
Each row is one flagged check-in or check-out.
| Column | What it shows |
|---|---|
| Name | The app user who checked in or out. Point your mouse at the name to see a short profile card. |
| Location | Where the person was when they checked in or out. If known, it also shows how far away from the site they were, for example "(2 km away)". |
| Project | The project they tried to check in to. |
| Gate | The check-in point at the site. In the left menu, these check-in points are listed under Site Locations. |
| Type | Whether it was a check-in (green) or a check-out (red). |
| Reported At | The date and time it was flagged. |
| Reason | Why it was flagged. |
If a value is missing, you will see N/A.
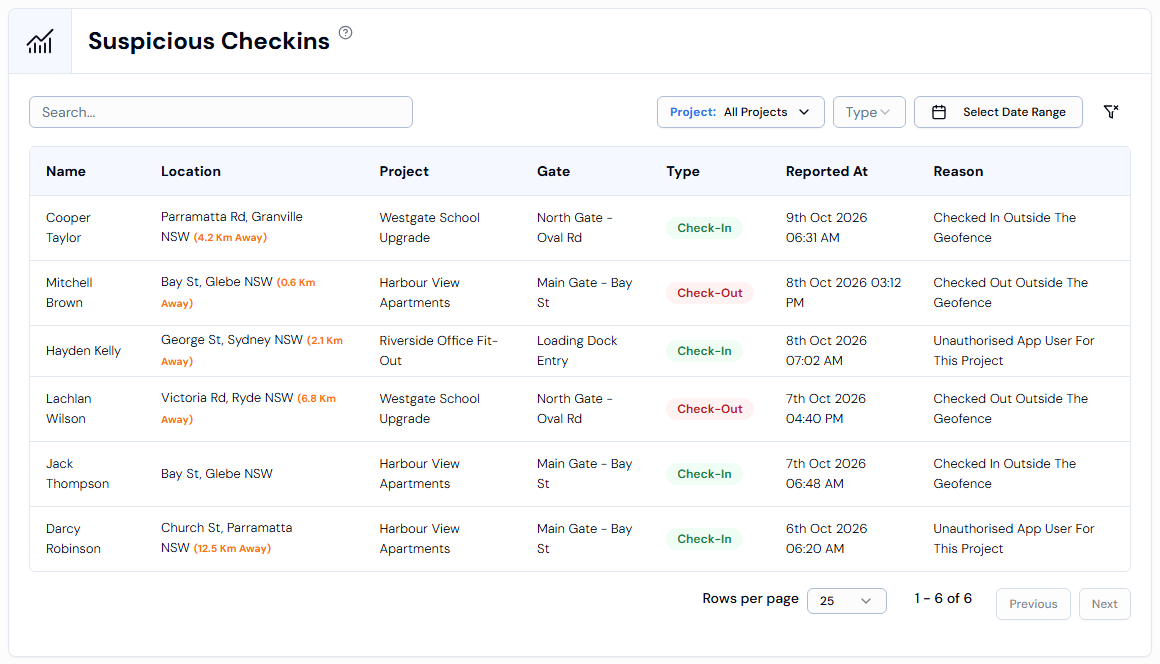
Step 3: Filter the list
Use the controls above the list to find what you need.
| Filter | How to use it |
|---|---|
| Search... | Type a person's name. The list updates as you type. |
| Project: | Click the button (it says All Projects to begin with) and pick a project. Type in Change Project... to search. Pick All Projects to see everything again. |
| Type | Choose Check-In or Check-Out. |
| Select Date Range | Pick a start date and an end date in the calendar. If you pick only one day, you see just that day. |
A filter that is in use turns blue.
To remove all filters, click the Clear Filters button (the funnel icon with a cross).
Step 4: Move between pages
At the bottom of the list:
- Use Rows per page to choose how many rows to show.
- Click Previous or Next to move between pages.
What can I do about a suspicious check-in?
This page is for reviewing only. You cannot approve, delete or change an entry here.
If something looks wrong, you can:
- Talk to the worker or their supervisor to find out what happened.
- Look at the person's full check-in history on the Checkin Records page. See How to View and Analyse Check-in Records.
- Check the person's hours before you approve their timesheet. See How Approval Works.
- If many people are flagged as outside the geofence at one site, check that the site boundary is drawn correctly. See How to Create a Site Location.
Troubleshooting
| What you see | What to do |
|---|---|
| No results. | Nothing matches your filters. Click Clear Filters and try again. |
| No results found. in the project list | No project matches what you typed. Check the spelling. |
| Upgrade to Premium Version to view the CheckIns. | Your account needs an active subscription to see this page. |