How Approval Works
Before a worker is paid, their timesheet needs to be checked and approved. Approving a timesheet tells SwiftCheckin the hours are correct and ready for payroll. Once a timesheet is approved, it is locked so nobody can change it by mistake.
This article explains each timesheet status, who can approve, and how to approve, reject or unapprove timesheets. It also explains Swift AI, which can point out unusual timesheets and suggest payable hours before you approve.
The life of a timesheet
In simple words, a timesheet usually moves through these steps:
- Onsite – the worker has checked in and is still on site. The timesheet is not finished yet.
- Pending – the worker has checked out (or someone added the timesheet by hand). It is waiting to be checked.
- Time Verified – (optional step) someone has checked that the start and finish times are right. It still needs payment approval.
- Approved – the hours are confirmed for payment. The timesheet is now locked.
- If you use Xero, the timesheet can then show Submitted to Xero (or Failed if sending did not work).
At any point before approval, a timesheet can be rejected, which gives it the Declined status. An approved timesheet can be unapproved to reopen it.
Statuses
| Status | What it means | Can you edit it? |
|---|---|---|
| Onsite | The worker is still checked in. | No |
| Pending | Waiting to be checked and approved. | Yes |
| Time Verified | The times have been checked. Waiting for payment approval. | Yes |
| Unapproved | It was approved, then reopened for changes. | Yes |
| Approved | Confirmed for payment and locked. | No – unapprove it first |
| Declined | Rejected. It will not be paid. | No |
| Submitted to Xero | Sent to Xero as part of a pay run. | No |
| Failed | Sending to Xero did not work. | No |
You can filter the list by any of these statuses using the Status filter on the Timesheets page.
Before you start: who can approve?
Not everyone can approve timesheets. This is set up in Approval Settings:
- Click your name at the bottom of the left menu, then click Account.
- In Profile Settings, click Settings.
- Click the Timesheet Settings tab.
- Open Approval Settings.
| Setting | What it does |
|---|---|
| Payment Approval | Pick the roles that can approve timesheets for payment. People with these roles see the Approve, Reject, Unapprove and Approve as 8 Hours buttons, and can change Payable Hrs. |
| Require Time Approval (Optional) | Turn on Yes if you want timesheet times checked before payment approval. |
| Site user roles (from the app) | When time approval is on, pick which site user roles (for example site managers) can verify timings from the mobile app. |
| Roles (from the Admin Platform) | When time approval is on, pick which admin roles can verify timings on the website. These people see the Time Verify button. |
Click Save Changes when you are done.
Approve one timesheet
- Open the Timesheets page (left menu, under Field Operations, click Timesheets).
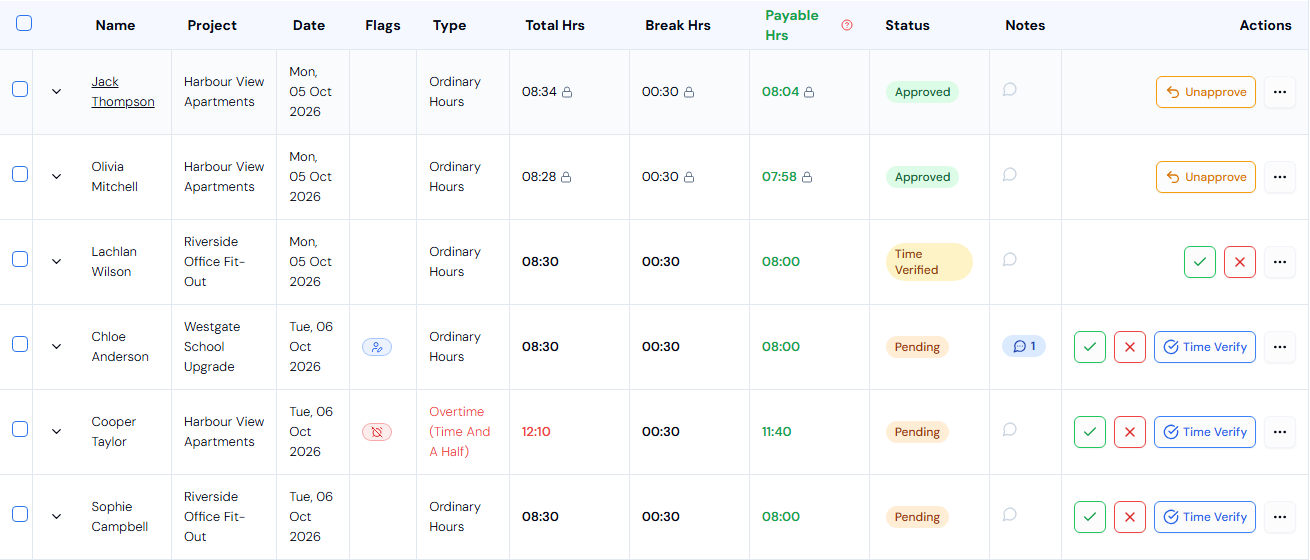
- Find the timesheet. You may want to set the Status filter to Pending and Time Verified.
- In the list view, click the green tick button at the end of the row.
- The Approve Timesheet window explains that this will finalize the timesheet for payment, and that approved timesheets are locked.
- Click Approve. You will see Timesheet Approved !.
Reject one timesheet
- Click the red cross button at the end of the row.
- In the Reject Timesheet window, click Reject.
- You will see Timesheet Rejected !. The status changes to Declined.
Verify the time (optional)
If your company uses time approval, people with a time-verify role see a Time Verify button on Pending timesheets.
- Click Time Verify at the end of the row.
- The Verify Timesheet Time window explains that a payroll admin will still need to approve it for payment.
- Click Time Verify. You will see Timesheet time verified. The status changes to Time Verified.
Approve or reject many timesheets at once
- Tick the box at the start of each timesheet. Tick the box in the header to pick every timesheet on the page.
- A bar appears at the bottom of the screen. It shows how many of the selected timesheets can be acted on (only Pending, Time Verified and Unapproved ones count).
- Click one of these buttons:
| Button | What it does |
|---|---|
| Approve | Approves all the selected timesheets. Click Approve in the Approve All Timesheet window. You will see Timesheets Approved !. |
| Approve as 8 Hours | Sets the payable hours to 08:00 on every selected timesheet, then approves them. Click Approve as 8 Hours to confirm. You will see Timesheets approved as 8 hours! This button is only in the list view. |
| Reject | Rejects all the selected timesheets. Click Reject in the Reject Timesheets window. |
Bulk actions work in both the list view and the weekly view.

Check unusual timesheets with Swift AI
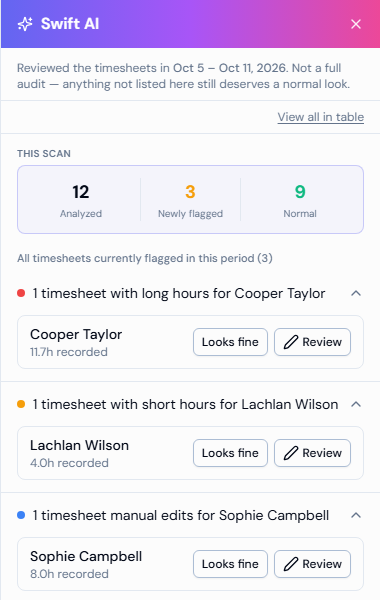
Swift AI looks through the timesheets for your chosen dates and points out ones that look unusual, such as very long or very short hours, odd check-in times, or hours that were changed by hand. This helps you spot problems before you approve.
Swift AI is not turned on for every account yet. If you don't see the Swift AI button at the top right of the Timesheets page, it isn't available for your login.
Step 1: Open Swift AI
- On the Timesheets page, choose the dates you want to check with the date button. See How to View and Edit Timesheets.
- Click Swift AI at the top right of the page. A number on the button shows how many timesheets are flagged.
- A panel opens on the right. Swift AI checks the timesheets for your dates. You will see a counter and Analyzing timesheets while it works.
Swift AI checks the dates you picked. The Projects filter does not seem to narrow the check. (To be confirmed.)
Step 2: Read the results
When the check is done, the panel shows:
| Part | What it shows |
|---|---|
| This scan | Analyzed (how many timesheets were checked), Newly flagged (new unusual ones found this time) and Normal (ones that look fine). |
| All timesheets currently flagged in this period | Every flagged timesheet for your dates, including ones flagged in an earlier check that nobody has dealt with yet. |
| Groups | The flagged timesheets are grouped by reason, for example 2 timesheets with long hours for ..., short hours, unusual check-in times, manual edits or flagged entries. Click a group to open or close it. |
Each flagged timesheet shows the worker's name and the hours recorded, for example 9.5h recorded.
If nothing looks unusual, you will see Nothing needs your attention.
The panel reminds you that this is not a full audit. Timesheets that are not listed still need your normal check.
Step 3: Deal with each flagged timesheet
For each timesheet, choose one:
- Looks fine – the timesheet is correct. It is removed from the list.
- Review – open a small window with more detail.
In the Review window you see the worker, the project and the reason, such as Excessive hours, Short hours, Manually edited, Late check-in or Early check-in. Then you can:
| Option | What it does |
|---|---|
| Change Recorded hours | Type the correct hours as a number (for example 7.5 for seven and a half hours) and click the tick. You will see Hours corrected to 7.5h. This sets the timesheet's payable hours and removes it from the list. You can only do this if you can approve payments and the timesheet is Pending, Time Verified or Unapproved. |
| Looks fine | Tells Swift AI the timesheet is correct and removes it from the list. |
| Flag for review | Confirms there is a problem. It is removed from the Swift AI list so you can fix it yourself. Shown for check-in and other flags. |
| Edit Timesheet | Opens the full timesheet so you can change anything. |
See flagged timesheets in the table
- In the Swift AI panel, click View all in table.
- The list view now shows only the flagged timesheets. A purple bar says Showing ... AI Flagged Timesheets.
- Click Show All Timesheets to go back to the normal list. Changing any filter also brings back the normal list.
Accept or reject suggested payable hours
For a timesheet that Swift AI has flagged, it may also suggest different payable hours (the hours that will be paid).
In the list view, flagged timesheets have a light purple background. In the Payable Hrs column you see Suggested, the current hours crossed out, and the suggested hours next to them.
- Click the tick to Accept suggestion, or the cross to Reject suggestion.
- A window opens:
- Accept Suggested Payable Hours shows the change from the current hours to the suggested hours.
- Reject Suggested Payable Hours explains the suggestion will be dismissed and the current hours kept.
- Type a Note to explain your choice. A note is required.
- Click Accept or Reject.
The Payable Hrs column then shows an AI Accepted or AI Rejected label. Hover over the small speech-bubble icon next to it to read the note.
After you accept a suggestion, refresh the page and check that Payable Hrs still shows the new hours before you approve. (To be confirmed: whether accepting saves the new payable hours, or only records your choice.)
Unapprove a timesheet
If you approved a timesheet by mistake, or need to change it, you can reopen it.
- Find the approved timesheet in the list view.
- Click Unapprove at the end of the row.
- The Unapprove Timesheet window explains that the timesheet will reopen for editing and will no longer count as approved.
- Click Unapprove. You will see Timesheet unapproved. It can now be edited again.
The status changes to Unapproved. You can now change it and approve it again.
If the timesheet has already been added to a pay run, the Unapprove button is greyed out. Hover over it to see Timesheet added to pay run.
Notes and merged timesheets
- Notes: the speech-bubble icon in the Notes column shows any notes on a timesheet. A number shows how many there are. Click it to read them in the Notes window.
- Merged timesheets: in the weekly view, if a worker has more than one timesheet on the same day, the hours are added together. Each timesheet still keeps its own status. Hover over the day and click View All to see each one and its status in the Merged Timesheets window.
Good to know
- Check Payable Hrs before you approve. Once approved, the timesheet is locked.
- The list view's Approved By and Verified By columns show who did each step.
- Open a timesheet and click the History tab to see every change, including approvals.
- Swift AI only helps you find unusual timesheets. You still approve or reject them yourself.
Troubleshooting
| Message | What to do |
|---|---|
| Something went wrong while running the AI review. | Swift AI couldn't check the timesheets. Close the panel and open it again. Any timesheets already flagged are still listed. |
| Something went wrong while loading Swift AI insights. | The flagged list couldn't be loaded. Try again later. |
| Something went wrong while submitting feedback. | Your choice wasn't saved. Try again. If you were accepting or rejecting a suggestion, your note is kept in the window, so just click Accept or Reject again. |
| The Accept or Reject button is greyed out | Type a Note first. |