How Pay Periods and Pay Runs Work
A pay period is the stretch of time you pay workers for, such as one week or two weeks. A pay run is a group of approved timesheets from one pay period that you send to your payroll program (Xero or MYOB) so workers can be paid.
In short:
- You set up your pay period once.
- Each pay period, you approve the timesheets.
- You put the approved timesheets into a pay run.
- You send the pay run to Xero, or export it to MYOB.
Before you start
- Connect Xero or MYOB. Click your name at the bottom of the left menu, then Account. In Profile Settings, click Integrations and connect one of them. Only one can be connected at a time. The Pay Run tab and button only appear once one is connected.
- Set up pay items. A pay item is a type of pay, such as regular hours or overtime. Go to Profile Settings > Settings > Timesheet Settings tab and open Setup PayItems. Give each pay item a Reference Type (Regular, Overtime, Annual Leave, Sick Leave Pay, Personal Leave Pay, Public Holiday or General Leave). If you use Xero, also choose the matching Xero Pay Item. You can click Sync PayItems from Xero to bring in your Xero pay items.
- If you use Xero, match your workers. Open Map Employees on the same tab to link each worker to their Xero employee record.
- If you use MYOB, map your columns. Open Map MYOB Import Columns. See How to Export Timesheets to MYOB and Excel.
Step 1: Set up your pay period
You only need to do this once.
- Click your name at the bottom of the left menu, then click Account.
- In Profile Settings, click Settings, then click the Timesheet Settings tab.
- Open Pay Period Settings.
- Click the + button.
- Click the date button and pick the start and end date of your first pay period on the calendar.
- In Type, choose Weekly or Fortnightly.
- Click the save button (the disk icon). Click the cross to cancel.
The pay period now shows with its Type, Period (dates) and Status.
The + button is greyed out once a pay period has been set up, so you can only add the first one here. SwiftCheckin then uses it to set out your pay periods, which you can pick from on the Timesheets page.
Pay period statuses
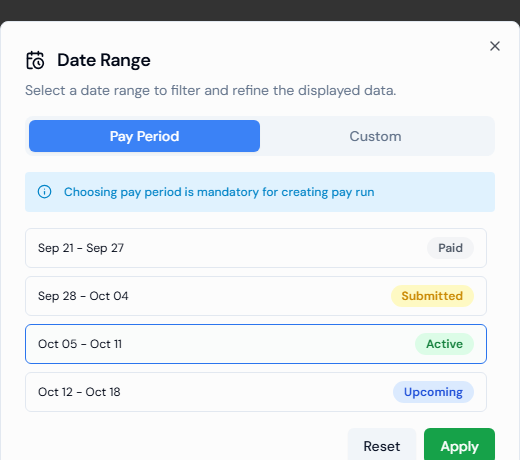
You see these statuses when you pick a pay period on the Timesheets page (date button > Pay Period tab).
| Status | What it means |
|---|---|
| active | The current pay period. The Timesheets page opens on this one. |
| upcoming | A future pay period. |
| submitted | A pay run for this period has been sent. |
| paid | Workers have been paid for this period. |
Step 2: Approve the timesheets
Only Approved timesheets can go into a pay run. See How Approval Works.
Step 3: Create a pay run
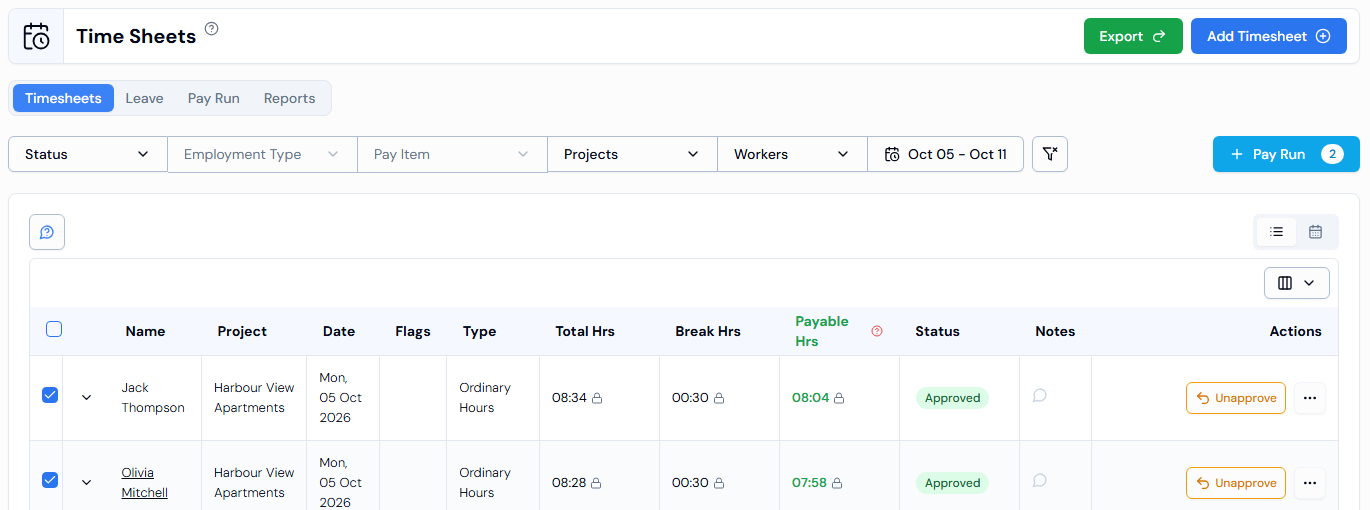
- In the left menu, under Field Operations, click Timesheets.
- Click the date button. On the Pay Period tab, pick the pay period and click Apply. A pay period must be chosen to create a pay run – custom dates won't work.
- If you use Xero: set the Employment Type filter to Employee. Pay runs for Xero can only be made for employees. The Pay Run button doesn't appear until you do this.
- Tick the Approved timesheets you want to pay. (Tip: set the Status filter to Approved first.)
- Click the blue Pay Run button. The number on the button shows how many approved timesheets you picked.
- A message confirms the pay run was created.
If you use Xero and some workers or pay items are not linked to Xero yet, a Something is missing window opens. It says Some of the users and pay item are not synced. Go to Settings. Click Go to Settings and finish the Map Employees and Setup PayItems steps, then try again.
Step 4: Check your pay runs
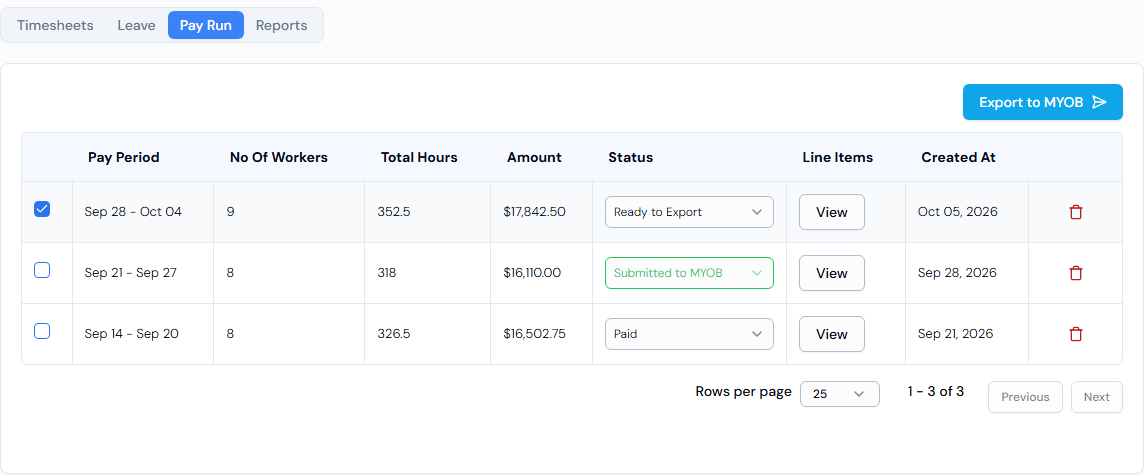
- Click the Pay Run tab on the Timesheets page.
- Each pay run shows:
| Column | What it shows |
|---|---|
| Pay Period | The dates the pay run covers. |
| No Of Workers | How many workers are in it. |
| Total Hours | Total hours in it. |
| Amount | The total amount to pay. |
| Status | Where the pay run is up to. You can change it here (see below). |
| Line Items | Click View to see every line in the Weekly Pay Run window: Date, Name, Worked Hours, Pay Item and Amount. |
| Created At | When the pay run was made. |
Step 5: Send the pay run to payroll
If you use Xero
- On the Pay Run tab, tick one or more pay runs.
- Click Send to Xero.
- You will see PayRun sent to Xero successfully. The timesheets in it show Submitted to Xero.
- Later, click Sync from Xero to bring back the latest status from Xero. You will see Synced from Xero successfully.
If you use MYOB
- On the Pay Run tab, tick one pay run.
- Click Export to MYOB.
- You will see PayRun exported to MYOB successfully. The file appears on your Downloads page (the download icon in the top bar).
- Download it and import it into MYOB.
Pay run statuses
You can change a pay run's status from the Status box in its row. You will see Pay Run Status Updated !
| Xero status | MYOB status | What it means |
|---|---|---|
| Ready to Send | Ready to Export | The pay run is made and waiting to go to payroll. |
| Submitted to Xero | Submitted to MYOB | It has been sent (or exported) to payroll. |
| Paid | Paid | Workers have been paid. |
| Failed | Failed | Something went wrong. Check and try again. |
Delete a pay run
- Click the bin icon at the end of the pay run's row.
- In the Confirm Deletion window, confirm.
- You will see PayRun deleted successfully.
Good to know
- An approved timesheet that is in a pay run can't be unapproved. The Unapprove button is greyed out and says Timesheet added to pay run.
- Pay rules decide which pay item (for example, regular or overtime) is used when timesheets are made automatically. You can set them up in Profile Settings > Settings > Payrule Settings tab.
Troubleshooting
| Problem | What to do |
|---|---|
| No Pay Run tab or button | Connect Xero or MYOB in Integrations. For Xero, also set Employment Type to Employee. |
| Pay Run button is greyed out | Tick at least one Approved timesheet. |
| Only approved timesheets are allowed | Untick any timesheet that isn't approved. |
| Failed to send PayRun. | Sending to Xero didn't work. Check your Xero connection and mapping, then try again. |
| Failed to export PayRun. | Making the MYOB file didn't work. Try again. |
| Sync failed. | SwiftCheckin couldn't get the latest status from Xero. Try again later. |