How to Export Timesheets to MYOB and Excel
Exporting means saving your timesheets as a file you can open on your computer or load into other software. SwiftCheckin can export timesheets:
- to Excel, so you can check or share hours in a spreadsheet, and
- to MYOB (a payroll program), so you can import approved hours and pay your workers.
Exports are prepared in the background. When a file is ready, you pick it up from the Downloads page.
Export timesheets to Excel
The Excel export uses the filters you have set on the Timesheets page, so set those first.
Step 1: Filter the timesheets
- In the left menu, under Field Operations, click Timesheets.
- Use the filters (Status, Employment Type, Pay Item, Projects, Workers and the date button) to show only the timesheets you want in the file. See How to View and Edit Timesheets.
If you don't pick any status, timesheets of every status are included.
Step 2: Choose an export type
There are two types of Excel export:
| Export type | What you get |
|---|---|
| Default | Full timesheet details, with one row for each timesheet. |
| Payroll | Hours grouped by worker, ready for payroll. |
Step 3: Start the export
How you start the export depends on whether MYOB is connected to your account.
If MYOB is not connected:
- Make sure you are in the list view (the list icon on the right of the timesheet panel). The Export button is not shown in the weekly view.
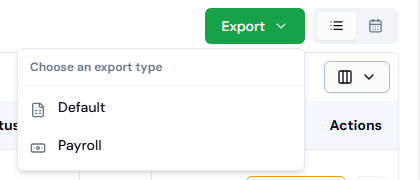
- Click the green Export button. A list opens with the heading Choose an export type.
- Click Default or Payroll.
- You will see Export started. You'll be notified once ready.
If MYOB is connected:
- Click the green Export button at the top right of the page, next to Add Timesheet.
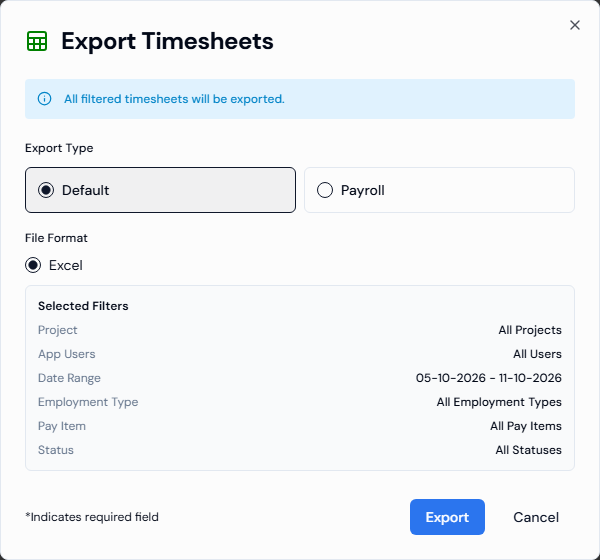
- The Export Timesheets window opens. It says All filtered timesheets will be exported.
- Under Export Type, pick Default or Payroll. Default is picked for you.
- Under File Format, Excel is selected.
- Check the Selected Filters box. It lists the Project, App Users, Date Range, Employment Type, Pay Item and Status that will be used. To change them, close the window and change the filters on the page.
- Click Export.
- You will see Your export is being processed. You'll be notified once it's complete.
The Export button on the Timesheets tab only makes Excel files. To make a MYOB file, export a pay run instead (see below).
Step 4: Download the file
See Find your files on the Downloads page below.
Export timesheets to MYOB
The MYOB file is made from a pay run. A pay run is a group of approved timesheets for one pay period. Only approved timesheets go into a pay run.
Before you start
- Connect MYOB. Click your name at the bottom of the left menu, then Account. In Profile Settings, click Integrations. Under Supported Apps for Manual Export, find Myob, click Connect, then click Connect to Myob. Only one payroll program (Xero or MYOB) can be connected at a time.
- Match your columns to MYOB. Go to Profile Settings > Settings > Timesheet Settings tab and open Map MYOB Import Columns. This makes sure the file has the information MYOB expects. See Map MYOB import columns below.
- Set up pay items and pay periods. See How Pay Periods and Pay Runs Work.
- Approve the timesheets. See How Approval Works.
Step 1: Create a pay run
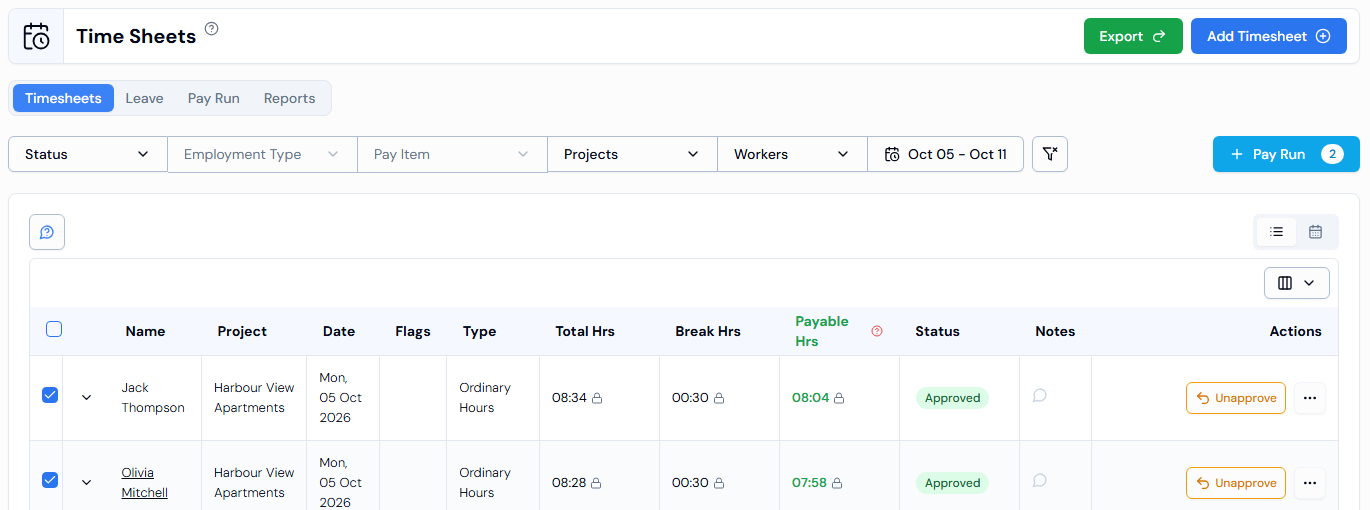
- On the Timesheets tab, click the date button and pick a Pay Period. Click Apply.
- Tick the Approved timesheets you want to pay.
- Click the blue Pay Run button. The number on the button shows how many approved timesheets you picked.
For full details, see How Pay Periods and Pay Runs Work.
Step 2: Export the pay run to MYOB
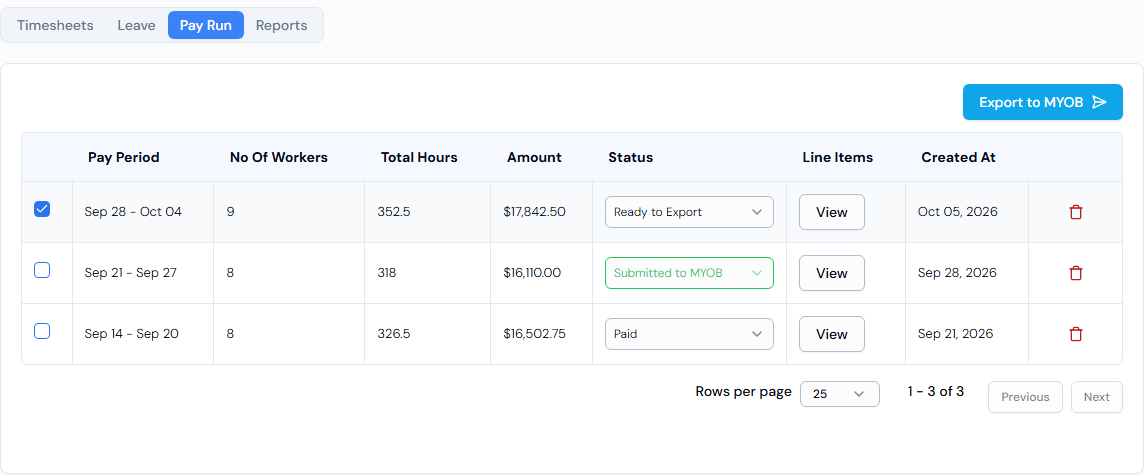
- Click the Pay Run tab.
- Tick the box next to the pay run you want. With MYOB you can pick one pay run at a time.
- Click Export to MYOB.
- You will see PayRun exported to MYOB successfully. The file is added to your Downloads page.
- Download the file and import it into MYOB.
After you have imported the file into MYOB, you can change the pay run's status to Submitted to MYOB, and later to Paid, so your team knows where it is up to.
Find your files on the Downloads page
- Click the download icon (a downward arrow) in the top bar, next to the notifications bell. A red number on the icon shows new files.
- The Downloads page lists all your exported timesheet files, with the date and file size.
- Each file shows one of these:
| What you see | What it means |
|---|---|
| A spinning circle, or Preparing Export... | The file is still being made. Wait a moment. |
| A download button | The file is ready. Click it to save the file to your computer. |
| Failed | The export did not work. Try exporting again. |
If you haven't exported anything yet, you will see No Downloads Yet. Click Go to Timesheets to go back to the Timesheets page.
Map MYOB import columns
Use this to tell SwiftCheckin which of its details go into which MYOB column.
- Go to Profile Settings > Settings > Timesheet Settings tab.
- Open Map MYOB Import Columns. (You only see this when MYOB is connected.)
- Click the + button. The Map Fields for MYOB Import window opens.
- Enter the MYOB Name (the column name MYOB uses).
- Choose the Swiftcheckin field name it matches: Payroll Id, Date, First Name, Last Name, Pay Item, Hours, Project Name or Project Number.
- Click Add. You will see Payroll settings added successfully!
To remove a mapping, click its delete button and confirm.
Troubleshooting
| Problem | What to do |
|---|---|
| I can't see the Export button | If MYOB is not connected, switch to the list view. If MYOB is connected, look at the top right of the page. |
| I can't see the Pay Run tab | Connect Xero or MYOB first. |
| The Pay Run button is greyed out | Tick at least one Approved timesheet. |
| Failed to export PayRun. | Something went wrong making the MYOB file. Try again. If it keeps failing, check your MYOB column mapping. |
| "Name" already exists. | You already have a MYOB column with this name. Use a different name. |