How to View and Edit Timesheets
A timesheet is a record of the time a worker spent on a project on one day. Most timesheets are created automatically when a worker checks in and out with the SwiftCheckin app. You can also add one yourself.
The Timesheets page lets you look through these records, find the ones you need with filters, and correct hours before they are approved for payment.
Step 1: Open the Timesheets page
- In the left menu, under Field Operations, click Timesheets.
- The Time Sheets page opens on the Timesheets tab.
The tabs at the top of the page
| Tab | What it is for |
|---|---|
| Timesheets | View, edit, approve and export timesheets. This is the tab this article covers. |
| Leave | Leave requests sent from the app. You only see this tab if Leave Requests is turned on in your settings. |
| Pay Run | Groups of approved timesheets ready to send to your payroll software. You only see this tab if Xero or MYOB is connected. See How Pay Periods and Pay Runs Work. |
| Reports | Charts and summaries of hours. See How to View Timesheet Reports. |
The buttons at the top right
| Button | What it is for |
|---|---|
| Swift AI | Points out unusual timesheets for your chosen dates. Only shown if Swift AI is turned on for your login. See How Approval Works. |
| Export | Shown here only when MYOB is connected. Otherwise the Export button is in the list view. See How to Export Timesheets to MYOB and Excel. |
| Add Timesheet | Add a timesheet by hand. See Add a timesheet by hand below. |
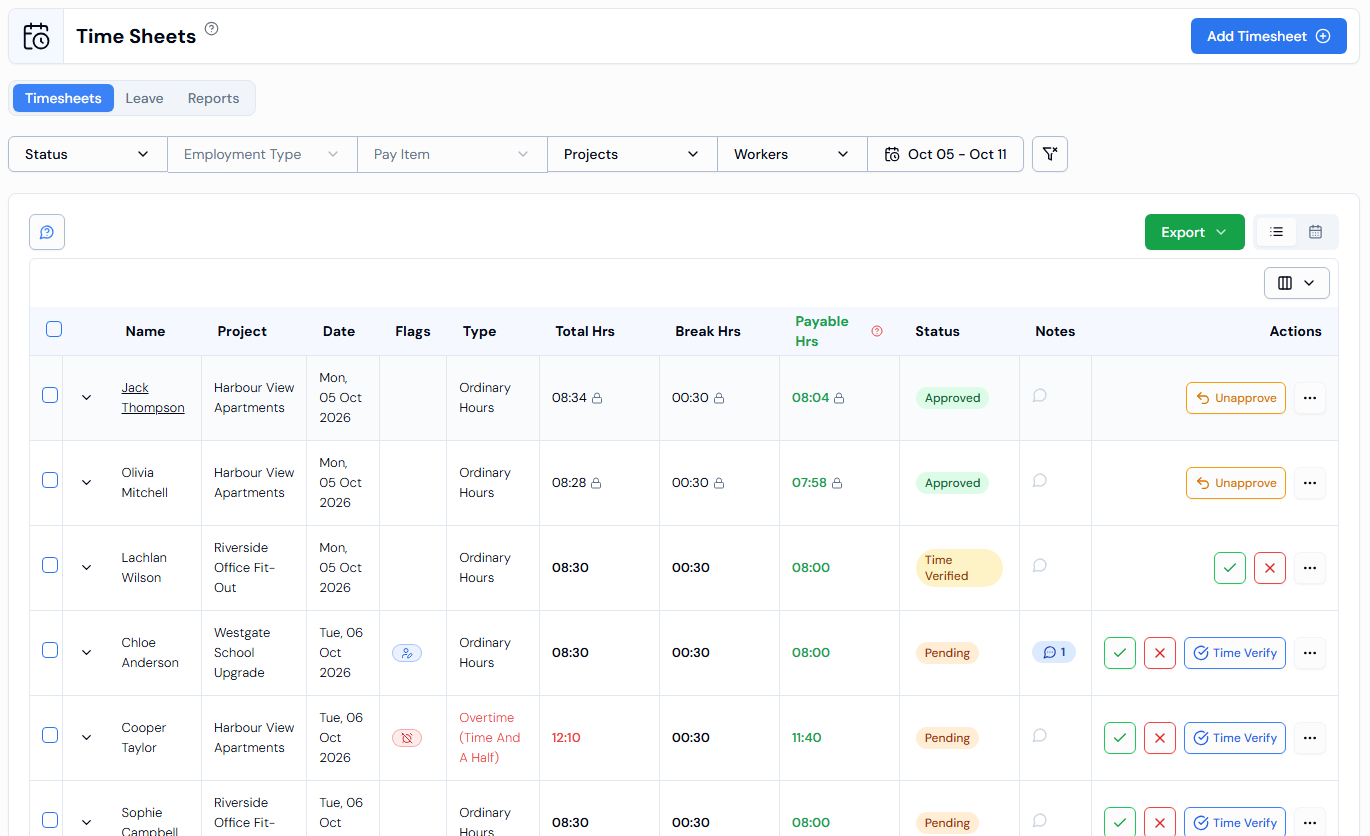
Step 2: Filter the list
Under the tabs is a row of filter buttons. When a filter is in use, its button turns blue and shows how many items you picked.
| Filter | What it does |
|---|---|
| Status | Show only timesheets with the statuses you tick (for example Pending or Approved). See How Approval Works for what each status means. |
| Employment Type | Show only Employee, Internal Subcontractor or External Subcontractor timesheets. |
| Pay Item | Show only timesheets with one pay item (for example a regular or overtime rate). Only in the list view. |
| Projects | Show timesheets from the projects you tick. You can search for a project by name. |
| Workers | Show timesheets for the workers you tick. You can search for a worker by name. |
| Date button | Shows the dates you are looking at (for example Jun 02 - Jun 08). Click it to change the dates. |
Each list filter has a Clear button at the bottom. To clear every filter at once, click the button with the funnel-and-cross icon at the end of the filter row.
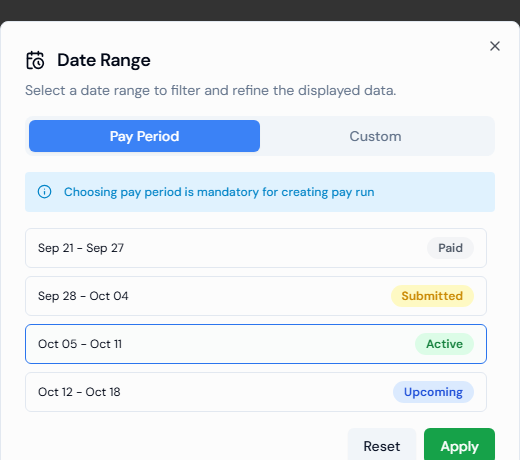
Choose the dates
- Click the date button.
- The Date Range window opens. Choose one of the two tabs:
- Pay Period – pick one of your pay periods from the list. Each one shows its status, such as active, upcoming, submitted or paid.
- Custom – pick any start and end date on the calendar.
- Click Apply. Click Reset to go back to the current pay period.
When the page first opens, it shows the current (active) pay period.
If you plan to create a pay run, choose a Pay Period rather than custom dates. The window reminds you: Choosing pay period is mandatory for creating pay run.
Step 3: Pick a view
On the right of the timesheet panel there are two small buttons:
- List view (list icon) – one row per timesheet. This is the default.
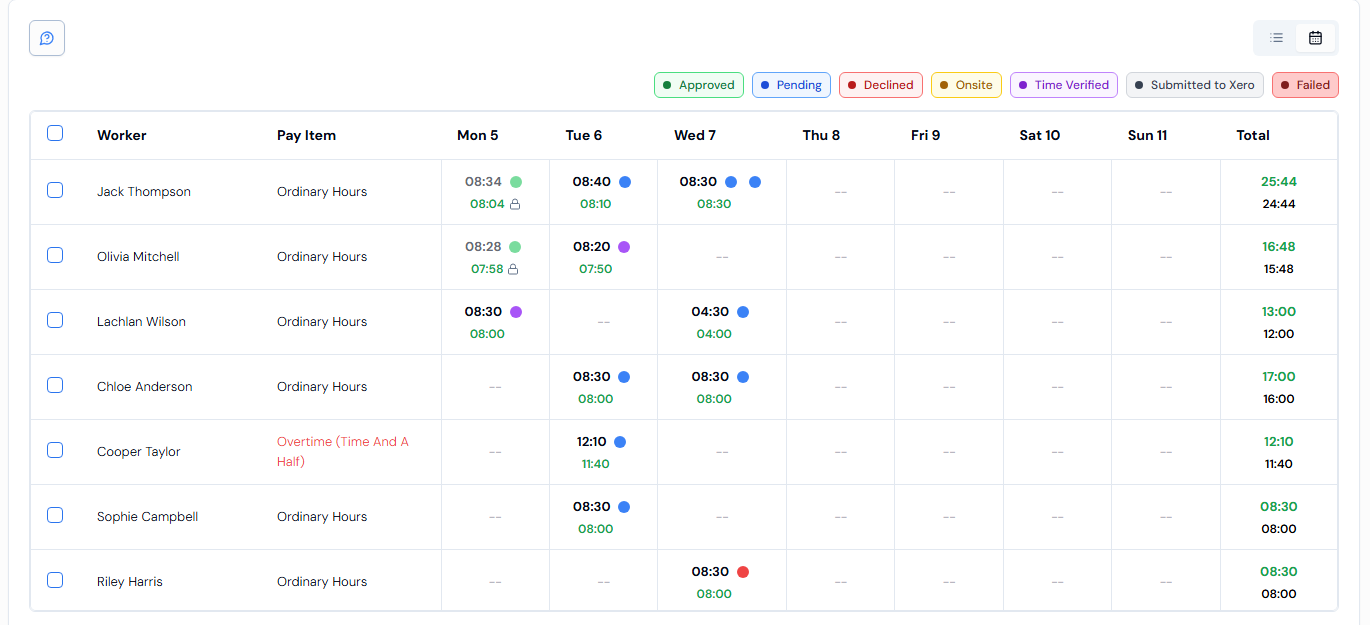
- Weekly view (calendar icon) – one row per worker and pay item, with a column for each day of the week.
List view
Each row shows the worker's Name, Project, Date, Start Time, End Time, hours, Status and more.
- Click the small arrow at the start of a row to open a quick summary of the Time, Approval and Hours for that timesheet.
- Click the worker's name to see their details.
- Click the speech-bubble icon in the Notes column to read notes added to the timesheet.
- Use the column settings button above the table to choose which columns you see. You can Show All, Hide All or Reset the columns.
- Use Rows per page, Previous and Next at the bottom to move through the list.
Some useful columns:
| Column | What it shows |
|---|---|
| Actual Start / Actual End | The real check-in and check-out times recorded by the app. |
| Total Hrs | The hours worked on the timesheet. |
| Break Hrs | Break time. Only shown when break hours are turned on in your settings. |
| Payable Hrs | The hours that will be paid, after any break is taken off and any rounding is applied. If you can see Swift AI, this column may also show Suggested hours, or an AI Accepted / AI Rejected label. See Accept or reject suggested payable hours. |
| Verified By / Approved By | Who checked the time and who approved it for payment. |
| Flags | Small icons that warn you about something unusual (see below). |
What the flags mean
Click the blue question-mark button at the top left of the panel to see these rules and icons at any time.
| Flag | What it means |
|---|---|
| Manual | The timesheet was created by hand. |
| Forced | An admin checked the worker out. |
| Auto | The system checked the worker out automatically. |
| Outside | The worker checked out without their location being confirmed. |
| +1d | The worker checked out on the next day. |
If Total Hrs is shown in red, the worker has more hours than expected for that entry.
Weekly view
The weekly view shows each worker's hours for every day in the date range, with a Total at the end of each row and at the bottom of each day.
- The coloured dots under the hours show the status of each timesheet. A key of colours is shown above the table.
- The green number under the hours is the Payable Hour for that day.
- Hover over a day to see more. Click View Details to open that timesheet.
- If a worker has more than one timesheet on the same day, the hours are added together (these are called merged timesheets). Hover over the day and click View All to see each one in the Merged Timesheets window.
Step 4: Edit hours in the table
You can change hours straight in the table, without opening the timesheet.
You can only change timesheets that are Pending, Time Verified or Unapproved. Approved timesheets show a lock icon. To change one, you must first unapprove it. See How Approval Works.
In the list view:
- Click the number in the Total Hrs, Break Hrs or Payable Hrs column. A pen icon shows which cells you can change.
- Type the new time as hours and minutes, for example
07:30. - Press Enter or click the tick to save. Click the cross to cancel.
In the weekly view:
- Double-click the hours for a day.
- Type the new time and press Enter. Press Esc to cancel.
- To change payable hours, click the green payable number instead.
You cannot change merged hours directly in the weekly view. Click View All, then click the hours of the single timesheet you want to change in the Merged Timesheets window.
Only people allowed to approve payments can change Payable Hrs. Who this is depends on your Approval Settings. See How Approval Works.
Step 5: Edit many timesheets at once (bulk edit)
- Tick the box at the start of each row you want to change. To pick every row on the page, tick the box in the header.
- A bar appears at the bottom of the screen showing how many timesheets you picked, and how many can be changed.
- Click one of the buttons:
- Edit Total Hours – set the same hours on every selected timesheet.
- Edit Payable Hours – set the same payable hours on every selected timesheet (list view only, and only if you can approve payments).
- In the window, type the time as
HH:MM(for example08:30) and click Update.
The same bar also has Approve, Approve as 8 Hours and Reject buttons. These are explained in How Approval Works.
To clear your selection, click the ✕ on the bar.

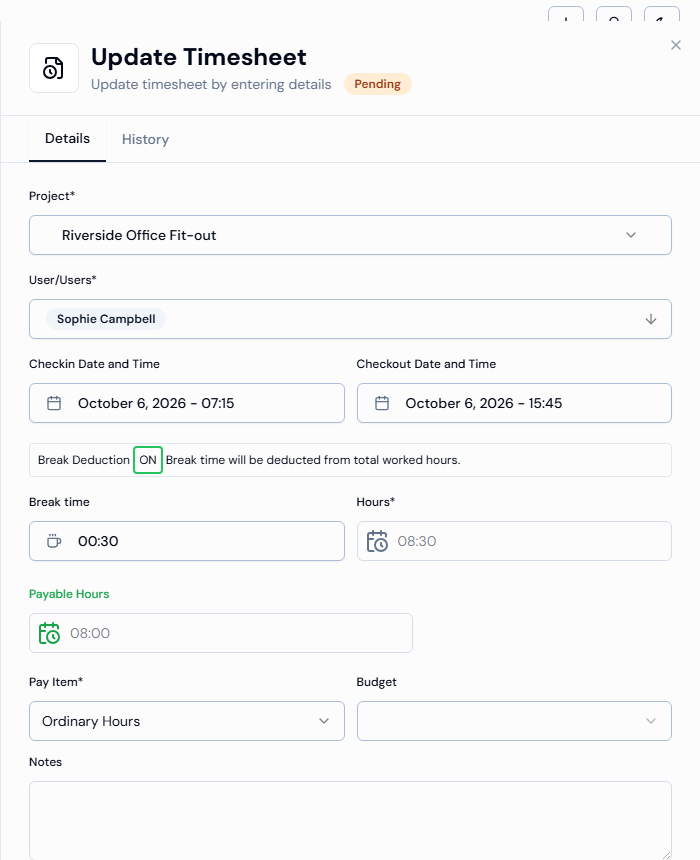
Step 6: Open a timesheet to see or change all its details
- In the list view, click anywhere on a row, or click the ... button at the end of the row and choose Edit (or View if the timesheet can't be changed).
- A panel opens on the right. It is called Update Timesheet, or View Timesheet for approved timesheets.
- On the Details tab you can change:
- Project
- Checkin Date and Time and Checkout Date and Time
- Break time (when break hours are turned on)
- Pay Item
- Budget
- Hours is worked out for you from the check-in, check-out and break times. Payable Hours is also shown, with how it was worked out.
- Click Update to save. You will see Timesheet has been updated successfully.
The History tab shows the Worked Hours, Verified Hours and Payable Hours, and a list of every change made to the timesheet, with dates.
Add a timesheet by hand
Use this when a worker forgot to check in or out.
- Click Add Timesheet at the top right of the page. This button only works when a project is selected.
- Fill in the Create Timesheet panel:
| Field | What to enter |
|---|---|
| Project* | The project the work was done on. |
| User/Users* | One or more workers. Only workers with time tracking turned on are listed. |
| Pay Item* | The type of pay, such as regular time or overtime. |
| Budget | Optional. The budget to charge the time to. |
| Start Date and Time* | When the work started (24-hour time). |
| End Date and Time* | When the work finished (24-hour time). |
| Break time | How long the break was, if break hours are turned on. |
| Hours* | Worked out for you. |
| Notes | Optional notes. |
- Click Create.
Fields marked with * are required.
Delete a timesheet
- Click the ... button at the end of the row and choose Delete.
- In the Confirm Deletion window, confirm.
You can only delete timesheets that were not created by the worker from the app, and that are not Approved or Onsite.
Troubleshooting
| Message | What to do |
|---|---|
| Invalid Time! | The time you typed is not valid. Use hours and minutes, such as 07:30. Minutes must be 59 or less. |
| Please enter a valid time (HH:MM) | In a bulk edit window, type the time as two numbers for hours, a colon, and two numbers for minutes. |
| Duration must be at least 15 minutes | The check-in and check-out times are too close together. Check the times. |
| Please enter a valid payable hours (HH:MM) | Fix the Payable Hours value so it is in hours and minutes. |
| No pen icon, or a lock icon | The timesheet is approved or in a status that can't be changed. Unapprove it first. |
| Add Timesheet is greyed out | Select a project first. |